2016年3月31日 星期四

iOS筆記:判斷裝置種類及取得Size資訊 & Super用法

這邊練習如何得知目前device的方向以及種類.

在ViewDidLoad中透過traitCollection屬性判斷裝置的種類.

- (void)viewDidLoad {
    [super viewDidLoad];
    // Do any additional setup after loading the view, typically from a nib.

    if (self.traitCollection.userInterfaceIdiom == UIUserInterfaceIdiomPad) {
        NSLog(@"Pad");
    } else if (self.traitCollection.userInterfaceIdiom == UIUserInterfaceIdiomPhone) {
        NSLog(@"Phone");
    }
}

實作- (void)willTransitionToTraitCollection:(UITraitCollection *)newCollection withTransitionCoordinator:(id<UIViewControllerTransitionCoordinator>)coordinator,這個方法是當width或是height的regular或compact有變化時呼叫.

iPad的長寬都是regular, 因此iPad方向變化時這個method不會被呼叫.

- (void)willTransitionToTraitCollection:(UITraitCollection *)newCollection withTransitionCoordinator:(id<UIViewControllerTransitionCoordinator>)coordinator
{
    [super willTransitionToTraitCollection:newCollection withTransitionCoordinator:coordinator];

    if (newCollection.horizontalSizeClass == UIUserInterfaceSizeClassCompact) {
        NSLog(@"Compact width");
    }
    if (newCollection.horizontalSizeClass == UIUserInterfaceSizeClassRegular) {
        NSLog(@"Regular width");
    }
    if (newCollection.verticalSizeClass == UIUserInterfaceSizeClassCompact) {
        NSLog(@"Compact Length");
    }
    if (newCollection.verticalSizeClass == UIUserInterfaceSizeClassRegular) {
        NSLog(@"Regular Length");
    }
}

實作- (void)viewWillTransitionToSize:(CGSize)size withTransitionCoordinator:(id<UIViewControllerTransitionCoordinator>)coordinator:當width或是height的解析度改變時呼叫, 可以在這個方法中透過UIDevice來判斷裝置是橫向還是直向.

- (void)viewWillTransitionToSize:(CGSize)size withTransitionCoordinator:(id<UIViewControllerTransitionCoordinator>)coordinator
{
    [super viewWillTransitionToSize:size withTransitionCoordinator:coordinator];

    UIDeviceOrientation orientation = [UIDevice currentDevice].orientation;
    if (orientation == UIDeviceOrientationLandscapeLeft) {
        NSLog(@"橫向, 頂端在左邊");
    }
    if (orientation == UIDeviceOrientationLandscapeRight) {
        NSLog(@"橫向, 頂端在右邊");
    }
    if (orientation == UIDeviceOrientationPortraitUpsideDown) {
        NSLog(@"直向但上下顛倒");
    }
    if (orientation == UIDeviceOrientationPortrait) {
        NSLog(@"直向");
    }
    if (orientation == UIDeviceOrientationUnknown) {
        NSLog(@"方向未知");
    }
}

Super

Assuming that MyClass is a subclass of BaseClass, the following happens when you call

  1. MyClass *mc = [[MyClass alloc] init];
  2. [MyClass alloc] allocates an instance of MyClass.
    The init message is sent to this instance to complete the initialization process.
    In that method, self (which is a hidden argument to all Objective-C methods) is the allocated instance from step 1.
  3. [super init] calls the superclass implementation of init with the same (hidden) self argument. (This might be the point that you understood wrongly.)
  4. In the init method of BaseClass, self is still the same instance of MyClass. This superclass init method can now either
    • Do the base initialization of self and return self, or
    • Discard self and allocate/initialize and return a different object.
  5. Back in the init method of MyClass: self = [super init] is now either
    • The MyClass object that was allocated in step 1, or
    • Something different. (That’s why one should check and use this return value.)
  6. The initialization is completed (using the self returned by the superclass init).
    So, if I understood your question correctly, the main point is that

[super init]
calls the superclass implementation of init with the self argument, which is a MyClass object, not a BaseClass object.

2016年3月29日 星期二

iOS筆記:NSURLSession

NSURLSession

NSURLSession從iOS9開始取代了Connection.

NSURLSessionTask 為抽象類別,它有三個子類別:NSURLSessionDataTask、NSURLSessionUploadTask、NSURLSessionDownloadTask 負責處理網路任務、取得JSON或XML資料,以及上傳下載文件: 範例

NSURL *url = [NSURL URLWithString:@"http://www.imdb.com/"];
    NSURLSession *session = [NSURLSession sharedSession];
    NSURLSessionDataTask *dataTask = [session dataTaskWithURL:url completionHandler:^(NSData * _Nullable data, NSURLResponse * _Nullable response, NSError * _Nullable error) {
        //NSLog(@"%@", data);
        NSLog(@"%@", response);
    }];
    [dataTask resume];

HTTPS

當完成session的request並執行後發生以下錯誤:

App Transport Security has blocked a cleartext HTTP (http://) resource load since it is insecure. Temporary exceptions can be configured via your app’s Info.plist file.

A: 原因是因為Applw將原HTTP協議改成了HTTPS協議,使用SSL TLS1.2加密請求數據.
iOS 9新增App Transport Security(ATS)的項目,重點是你在APP中如果有網路的要求時,其網址必定要是加密協定(https),否則連線要求會被禁止。主要是保護您的APP在進行網路通訊時一切資料都是加密,防止被嗅探。

解法:在info.plist中添加

<key>NSAppTransportSecurity</key><dict>
    <key>NSAllowsArbitraryLoads</key>
    <true/></dict>

參考:
1. http://my.oschina.net/u/2340880/blog/618888
2. http://cms.35g.tw/coding/ios-9-xcode7-http-%E9%8C%AF%E8%AA%A4/
3. https://www.raywenderlich.com/67081/cookbook-using-nsurlsession

2016年3月6日 星期日

iOS筆記:Swift練習(5)

CoreData

提供了一種儲存資料到persistent store的方式, 可以將APP中的物件與資料庫中的表格相對映.

建立託管物件

被綁訂在CoreData的物件稱為託管物件. 它用來呈現APP的資料且存於托管物件內容中

託管物件是NSManagedObject的子類別, 代表一個Entity. 在Swift中, 我們在每一個所定義的property前面加上@NSManaged, 讓他對應Restaurant Entity的屬性(attribute).

import CoreData

class Restaurant:NSManagedObject{
    @NSManaged var name:String
    @NSManaged var type:String
    @NSManaged var location:String
    @NSManaged var phoneNumber:String?
    @NSManaged var image:NSData?
    @NSManaged var isVisited:NSNumber?
    @NSManaged var rating:String?

指定Entity給Restaurant類別
enter image description here

透過CoreData 儲存資料

  1. 從AppDelegate取得託管物件內容.
if let managedObjectContext = (UIApplication.sharedApplication().delegate as? AppDelegate)?.managedObjectContext { ...
        }
  1. 呼叫insertNewObjectForEntityForName來針對Restaurant Entity建立託管物件
restaurant = NSEntityDescription.insertNewObjectForEntityForName("Restaurant", inManagedObjectContext: managedObjectContext) as! Restaurant
  1. 呼叫save方法來告訴context要儲存物件
do {
       try managedObjectContext.save()
   } catch {
       print(error)
       return
       }

透過CoreData讀取資料

最基本的方式就是用託管物件內容所提供的方法來達成:

if let managedObjectContext = (UIApplication.sharedApplication().delegate as? AppDelegate)?.managedObjectContext {

       let fetchResultController = NSFetchedRequest(entityName: "Restaurant")
       do {
           try managedObjectContext.executefetchRequest(fetchRequest) as! [Restaurant]
       } catch {
           print(error)
       }
}

NSFetchedResultsController API

特別設計用來處理Core Data讀取後所回傳的結果, 並提供資料給表格視圖. 會監看託管物件內容中的物件變更, 然後將變更結果報告給其代理.

    1.
import CoreData

class RestaurantTableViewController: UITableViewController, NSFetchedResultsControllerDelegate 
  1. 宣告實體變數來讀取結果控制器
    var fetchResultController:NSFetchedResultsController!

  2. NSSortDescriptor可以讓你指定物件間的排序.
    當讀取結果建立完成後, 先初始化NSFetchedResultsController, 呼叫performFetch()來執行讀取結果. 完成後我們存取fetchedObjects來存取Restaurant物件. fetchedObjects回傳的事AnyObject屬性所以這邊要強制轉型!
let fetchRequest = NSFetchRequest(entityName: "Restaurant")
        let sortDescriptor = NSSortDescriptor(key: "name", ascending: true)
        fetchRequest.sortDescriptors = [sortDescriptor]

        if let managedObjectContext = (UIApplication.sharedApplication().delegate as? AppDelegate)?.managedObjectContext {

            fetchResultController = NSFetchedResultsController(fetchRequest: fetchRequest, managedObjectContext: managedObjectContext, sectionNameKeyPath: nil, cacheName: nil)
            fetchResultController.delegate = self

            do {
                try fetchResultController.performFetch()
                restaurants = fetchResultController.fetchedObjects as! [Restaurant]
            } catch {
                print(error)
            }
        }

如果有任何內容變更, 以下方法會被呼叫.

// MARK: - NSFetchedResultsControllerDelegate

    func controllerWillChangeContent(controller: NSFetchedResultsController) {
        tableView.beginUpdates()
    }

    func controller(controller: NSFetchedResultsController, didChangeObject anObject: AnyObject, atIndexPath indexPath: NSIndexPath?, forChangeType type: NSFetchedResultsChangeType, newIndexPath: NSIndexPath?) {

        switch type {
        case .Insert:
            if let _newIndexPath = newIndexPath {
                tableView.insertRowsAtIndexPaths([_newIndexPath], withRowAnimation: .Fade)
            }
        case .Delete:
            if let _indexPath = indexPath {
                tableView.deleteRowsAtIndexPaths([_indexPath], withRowAnimation: .Fade)
            }
        case .Update:
            if let _indexPath = indexPath {
                tableView.reloadRowsAtIndexPaths([_indexPath], withRowAnimation: .Fade)
            }

        default:
            tableView.reloadData()
        }

        restaurants = controller.fetchedObjects as! [Restaurant]
    }

    func controllerDidChangeContent(controller: NSFetchedResultsController) {
        tableView.endUpdates()
    }

第一個方法是當讀取結果控制器準備開始處理內容變更時呼叫, 我們只是告訴表格視圖 “我們要更新表格了 快準備好”.
第二個方法是當託管物件內容有任何變更時會被呼叫.
第三個方始只是用來告訴表格視圖我們已經完成更新.

刪除CoreData資料

呼叫deleteObject的方法來刪除託管物件即可.

let deleteAction = UITableViewRowAction(style: UITableViewRowActionStyle.Default, title: "Delete",handler: { (action, indexPath) -> Void in

            // Delete the row from the database
            if let managedObjectContext = (UIApplication.sharedApplication().delegate as? AppDelegate)?.managedObjectContext {

                let restaurantToDelete = self.fetchResultController.objectAtIndexPath(indexPath) as! Restaurant
                managedObjectContext.deleteObject(restaurantToDelete)

                do {
                    try managedObjectContext.save()
                } catch {
                    print(error)
                }
            }
        })

UISearchController

簡化了建立搜尋欄位的方法以及搜尋結果的處理. 甚至提供開發者透過自訂的動畫物件, 能更彈性的改變搜尋欄的動畫.

第二行為建立instance, 傳遞nil的值表示搜尋結果會顯示於你正在搜尋的相同視圖中.另外也可以指定其他ViewController來顯示搜尋結果.
第四行為告訴searchResultsUpdater, 哪一個物件會負責更新搜尋結果

var searchController:UISearchController!

searchController = UISearchController(searchResultsController: nil)
tableView.tableHeaderView = searchController.searchBar
searchController.searchResultsUpdater = self        

內容過濾

UISearchController在預設環境下並沒有提供任何過濾環境的功能, 必須自己負責實作內容的過濾規則.

在Swift中有一個內建方法叫filter, 是用來過濾目前的陣列. 只需要在閉包中提供過濾規則即可.
在下面的程式中, 我們使用rangeOfString來檢查是否有相對應的名稱在搜尋文字內, 若是沒有找到就會回傳nil, 最後再檢查是否有找到搜尋文字, 並回傳相對應的Bool value.

func filterContentForSearchText(searchText: String) {
        searchResults = restaurants.filter({ (restaurant:Restaurant) -> Bool in
            let nameMatch = restaurant.name.rangeOfString(searchText, options: NSStringCompareOptions.CaseInsensitiveSearch)
            return nameMatch != nil
        })
    }

更新搜尋結果

接著要實作如何在畫面上更新與顯示搜尋到的結果.

  1. 使用UISearchResultsUpdating Delegate.
  2. updateSearchResultsForSearchController 為定義在協定中的一個方法. 當使用者選取搜尋欄時或者在裡面做了些變更時會被呼叫.
func updateSearchResultsForSearchController(searchController: UISearchController) {
    if let searchText = searchController.searchBar.text {
        filterContentForSearchText(searchText)
        tableView.reloadData()
    }
}
  1. 當完成到這一步的時候, tableView會同時顯示所有的餐廳資訊以及你的搜尋結果, 所以需要透過以下的方式來變免這種狀況發生.
override func tableView(tableView: UITableView, numberOfRowsInSection section: Int) -> Int {
        if searchController.active {
            return searchResults.count
        } else {
            return restaurants.count
        }
    }

自訂SearchBar外觀

// Customize the appearance of the search bar
        searchController.searchBar.placeholder = "Search restaurants..."
        searchController.searchBar.tintColor = UIColor(red: 100.0/255.0, green: 100.0/255.0, blue: 100.0/255.0, alpha: 1.0)
        searchController.searchBar.barTintColor = UIColor(red: 240.0/255.0, green: 240.0/255.0, blue: 240.0/255.0, alpha: 0.6)

Optional Binding - if let & if var

如果無法確定變數是否為nil就貿然使用! 運算子,當該變數真的為nil時,就會發生Run-Time Error。所以當在執行Optional型別的運算的時候,最好是先判斷是否為nil值再進行運算。

var a:String = "Hello "
var b:String? = "bbb"

if b != nil {
    var c = b!
    print(a+c)
}

上面的寫法其實有些麻煩,所以Swift提供了一個語法 - 使用if let或if var。如下例所示,意思是如果b變數不是nil,則c變數等於b變數,並執行後面的statement。如果b變數是nil,則不執行該段statement。if let或if var就是所謂的Optional Binding語法

var a:String = "Hello "
var b:String? = "bbb"

if let c = b {
    print(a+c)
}

iOS筆記:Swift練習(4)

Use MapKit

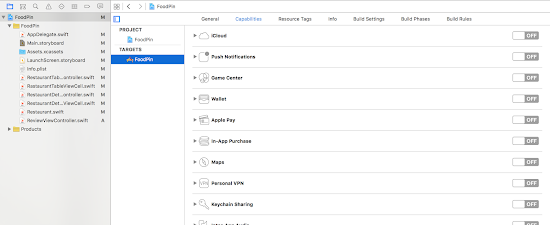
預設是沒有導入MapKit的, 如果需要使用的話, 可以從以下畫面將框架打開. Xcode會自動的將專案設定為啟動Mapkit.

再來就是要在專案的ViewController中加入 import MapKit.
enter image description here

Geocoder類別

Mapkit提供這個類別讓我們可以將文字地址轉換成經緯度. 另外也可以將經緯度轉換為一般的地址.

let geoCoder = CLGeocoder()
        geoCoder.geocodeAddressString("524 Ct St, Brooklyn, NY 11231", completionHandler: { placemarks, error in

            //地址的處理
        })

geocodeAddressString 接收的值沒有指定格式, 地址被解析之後會回傳一個地標物件的陣列. 回傳的物件的數字是依照你提供的地址資料來決定. 提供的越詳細回傳的結果就越準確. 如果標示的不夠準確可能會得到多個地標物件.

有了placemark物件就可以用以下方式取得地址了:

let coordinate = placemark.location.coordinate

completionHandler: { }是前面向Geocoding請求完成後要執行的程式碼.

地圖上加上大頭針

一般要加入一個標準的大頭針以及標示需要透過MKAnnotation的以下方法.
利用showAnnotations來放置大頭針.

// Add annotation
let annotation = MKPointAnnotation()
annotation.title = self.restaurant.name
annotation.coordinate = location.coordinate

// Display the annotation
self.mapView.showAnnotations([annotation], animated: true)
self.mapView.selectAnnotation(annotation, animated: true)

在大頭針旁加上圖像

如果要在大頭針旁加上圖像的縮圖就需要使用MapKit的MKMapViewDelegate中一個可選的func mapView(mapView: MKMapView, viewForAnnotation annotation: MKAnnotation) -> MKAnnotationView?

  1. 加入Delegate:
class MapViewController: UIViewController, MKMapViewDelegate
  1. 在viewDidLoad中, 定義mapView的代理
mapView.delegate = self
  1. 實作 func mapView(mapView: MKMapView, viewForAnnotation annotation: MKAnnotation) -> MKAnnotationView?
func mapView(mapView: MKMapView, viewForAnnotation annotation: MKAnnotation) -> MKAnnotationView? {
        let identifier = "MyPin"

        if annotation.isKindOfClass(MKUserLocation) {
            return nil
        }

        // Reuse the annotation if possible
        var annotationView:MKPinAnnotationView? = mapView.dequeueReusableAnnotationViewWithIdentifier(identifier) as? MKPinAnnotationView

        if annotationView == nil {
            annotationView = MKPinAnnotationView(annotation: annotation, reuseIdentifier: identifier)
            annotationView?.canShowCallout = true
        }

        let leftIconView = UIImageView(frame: CGRectMake(0, 0, 53, 53))
        leftIconView.image = UIImage(named: restaurant.image)
        annotationView?.leftCalloutAccessoryView = leftIconView

        // Pin color customization
        annotationView?.pinTintColor = UIColor.orangeColor()

        return annotationView
    }

dequeueReusableAnnotationViewWithIdentifier 用來查看是否有任何沒有在使用的view可以使用, 有的話就轉換為MKPinAnnotationView

如果沒有的話就透過實體化的方式建立一個新的view

一些其他Map的自訂

a. 顏色:

annotationView?.pinTintColor = UIColor.orangeColor()

b. 客製化:

// Map customization
mapView.showsCompass = true //顯示器右上角會顯示指南針
mapView.showsScale = true   //顯示比例 
mapView.showsTraffic = true //顯示交通流量大的點

UIImagePickerController

UIKit提供這個方便的API用來從照片庫載入照片, 另外也支援一個可以拍照的相機介面.

此為當Cell被選取後會被呼叫. 這裡的條件式是想讓我們只從照片庫中提取照片.
接著呼叫presentViewController來帶出PhotoLibrary

override func tableView(tableView: UITableView, didSelectRowAtIndexPath indexPath: NSIndexPath) {
        if indexPath.row == 0 {
            if UIImagePickerController.isSourceTypeAvailable(.PhotoLibrary) {
                let imagePicker = UIImagePickerController()
                imagePicker.allowsEditing = false
                imagePicker.sourceType = .PhotoLibrary

                self.presentViewController(imagePicker, animated: true, completion: nil)
            }
        }

        tableView.deselectRowAtIndexPath(indexPath, animated: true)
    }

使用UIImagePickerController Delegate

需要透過Delegate才能將選取的照片傳回呼叫的ImageView.

  1. 如果想跟Image Picker互動, 首先要先新增兩個Delegate
    UIImagePickerControllerDelegate, UINavigationControllerDelegate

  2. 當使用者從照片庫挑選後, 下面這個方法會被呼叫.
    通過實行這個方法, 可以從方法的參數中取得被選取的照片.

func imagePickerController(picker: UIImagePickerController, didFinishPickingMediaWithInfo info: [String : AnyObject]) {
        <#code#>
    }

Ex.

func imagePickerController(picker: UIImagePickerController, didFinishPickingMediaWithInfo info: [String : AnyObject]) {
        imageView.image = info[UIImagePickerControllerOriginalImage] as? UIImage
        imageView.contentMode = UIViewContentMode.ScaleAspectFill
        imageView.clipsToBounds = true

        dismissViewControllerAnimated(true, completion: nil)
    }
  1. 別忘記要讓 delegate = self

Auto layout in code

利用NSLayoutConstraint的API來加入約束條件.

let leadingConstraint = NSLayoutConstraint(item: imageView, attribute: NSLayoutAttribute.Leading, relatedBy: NSLayoutRelation.Equal, toItem: imageView.superview, attribute: NSLayoutAttribute.Leading, multiplier: 1, constant: 0)
        leadingConstraint.active = true

        let trailingConstraint = NSLayoutConstraint(item: imageView, attribute: NSLayoutAttribute.Trailing, relatedBy: NSLayoutRelation.Equal, toItem: imageView.superview, attribute: NSLayoutAttribute.Trailing, multiplier: 1, constant: 0)
        trailingConstraint.active = true

        let topConstraint = NSLayoutConstraint(item: imageView, attribute: NSLayoutAttribute.Top, relatedBy: NSLayoutRelation.Equal, toItem: imageView.superview, attribute: NSLayoutAttribute.Top, multiplier: 1, constant: 0)
        topConstraint.active = true

        let bottomConstraint = NSLayoutConstraint(item: imageView, attribute: NSLayoutAttribute.Bottom, relatedBy: NSLayoutRelation.Equal, toItem: imageView.superview, attribute: NSLayoutAttribute.Bottom, multiplier: 1, constant: 0)
        bottomConstraint.active = true

預設約束條件在實體化後不會啟動, 必須設定active為true才行!

2016年3月5日 星期六

iOS筆記:Swift練習(3)

ImageView的縮放

  1. Scale to Fill (預設):圖像的寬高比會隨著縮放改變.
  2. Aspect Fit:圖像的寬高比會保持固定. 不過可能會在圖像的兩旁留下空白
  3. Aspect Fill:圖會等比例縮放來填滿視圖尺寸, 因為是等比例所以有些部分可能無法顯示

如果另外有勾選Clip SubView 可以避免圖像延伸到其他的視圖區域(ex. TableView…)

Content Hugging Priority

Stack View依靠這個優先權來決定是否應該將Field 標籤或是Value標籤延伸, 有較高優先權的視圖會有較高的抵抗順序, 將會維持原來的大小.

自訂表格視圖外觀

// Change the color of the table view
        tableView.backgroundColor = UIColor(red: 240.0/255.0, green: 240.0/255.0, blue: 240.0/255.0, alpha: 0.2)

        // Remove the separators of the empty rows
        tableView.tableFooterView = UIView(frame: CGRectZero)

        // Change the color of the separator
        tableView.separatorColor = UIColor(red: 240.0/255.0, green: 240.0/255.0, blue: 240.0/255.0, alpha: 0.8)

        // Set the title of the navigation bar
        title = restaurant.name

有內容的cell顏色還是白色的

    cell.backgroundColor = UIColor.clearColor()

自定導覽列的外觀

UIAppearance讓開發者可以去自訂大部分UIKit元件的外觀, 包含整個應用程式的導覽列.
ex. UINavigationBar.appearance()

func application(application: UIApplication, didFinishLaunchingWithOptions launchOptions: [NSObject: AnyObject]?) -> Bool {
        // Override point for customization after application launch.

        UINavigationBar.appearance().barTintColor = UIColor(red: 242.0/255.0, green: 116.0/255.0, blue: 119.0/255.0, alpha: 1.0)
        UINavigationBar.appearance().tintColor = UIColor.whiteColor()

        if let barFont = UIFont(name: "Avenir-Light", size: 24.0) {
            UINavigationBar.appearance().titleTextAttributes = [NSForegroundColorAttributeName:UIColor.whiteColor(), NSFontAttributeName:barFont]
        }

        // Change the status bar's appearance
        UIApplication.sharedApplication().statusBarStyle = .LightContent

        return true
    }

AppDelegate就像是應用程式的進入點, 這個類別是由Xcode的在專案建立時產生的. 如果想變更的東西是關係到整個應用程式的話, 通常會將自訂的程式放在這裡.

        // Remove the title of the back button
        navigationItem.backBarButtonItem = UIBarButtonItem(title: "", style: .Plain, target: nil, action: nil)

在iOS8中, Apple可以讓你用滑動或是點選來隱藏導覽列. 勾選On Swipe再利用以下的code關掉它

override func viewWillAppear(animated: Bool) {
        super.viewWillAppear(animated)

        navigationController?.hidesBarsOnSwipe = true
    }

因為這功能是針對整個應用程式的導覽列, 針對不想被隱藏導覽列的部分可以這樣

override func viewWillAppear(animated: Bool) {
        super.viewWillAppear(animated)

        navigationController?.hidesBarsOnSwipe = false
        navigationController?.setNavigationBarHidden(false, animated: true)
    }

Cell的自適應性跟動態調整

前提:如果不對Cell進行Auto Layout的話就無法使用 Self Sizing Cell.

第一行為設定Cell估算的列高
第二行是將rowHeight屬性改為UITableViewAutomaticDimension

        tableView.estimatedRowHeight = 36.0
        tableView.rowHeight = UITableViewAutomaticDimension

最後一個步驟是將Label的Lines值設定為0

背景圖案加上模糊特效

流程為:建立一個UIVisualEffectView物件加上模糊特效, 接著加上一個視覺特效視圖(Visual effect view) 至背景圖像視圖. UIBlurEffect 提供三種不同的樣式:Dark, Light, ExtraLight.

override func viewDidLoad() {
        super.viewDidLoad()

        let blurEffect = UIBlurEffect(style: .Dark)
        let blurEffectView = UIVisualEffectView(effect: blurEffect)
        blurEffectView.frame = view.bounds
        backgroundImageView.addSubview(blurEffectView)
    }

UIView Animation

在iOS中, 只需要提供動畫的起始與終止狀態, UIView就會幫忙建立動畫. 也提供變形的函數, 讓你可以縮放, 旋轉與移動圖.

縮放視圖的方式是建立一個CGAffineTransformMakeScale, 並設定UIView物件的transform屬性.

    ratingStackView.transform = CGAffineTransformMakeScale(0.0, 0.0)

當他第一次載入時, 堆疊視圖縮小:

override func viewDidAppear(animated: Bool) {
        UIView.animateWithDuration(0.4, delay: 0.0, options: [], animations: {
            self.ratingStackView.transform = CGAffineTransformIdentity
        }, completion: nil)
    }

在視圖載入後, 就將動畫載入進來, 因此我們需要一個animation block至viewDidAppear方法內. 動畫持續時間0.4秒. CGAffineTransformIdentity是重新設定一個View至原來大小以及位置的常數.

Spring Animation

Damping: 控制當動畫來到終止狀態時彈性的阻力(0 -> 1)
usingSpringWithDamping: 指定了初始的彈性速度.

UIView.animateWithDuration(0.5, delay: 0.0, usingSpringWithDamping:0.3, initialSpringVelocity: 0.5, options: [], animations: {
            self.ratingStackView.transform = CGAffineTransformIdentity
        }, completion: nil)

Slide-Up Animation

對於向上滑動的視圖, 我們先將堆疊視圖移開畫面再將它移回原來的位置.

CGAffineTransformMakeTranslation(x,y)

兩種變換方式的合併

利用以下方式可以將兩種變換合為一種

CGAffineTransformConcat(transform1, tramsform2)

ex.

let scale = CGAffineTransformMakeScale(0.0, 0.0)
let translate = CGAffineTransformMakeTranslation(0, 500)
self.ratingStackView.transform = CGAffineTransformConcat(scale, translate)

Unwind Segue

將資料回傳給前一個View

官方教學:
https://developer.apple.com/library/ios/technotes/tn2298/_index.html
http://blog.csdn.net/kid_devil/article/details/23218195 (中文)