2015年9月30日 星期三

iOS筆記:NSUserDefaults & UIAlertView in iOS

NSUserDefaults,可以簡單的紀錄一些資訊,說簡單也是能紀錄所有Cocoa上的所有Object(除了自訂的資料型態,要自行處理)。
NSUserDefaults is a way to store information in our Device, that we don’t have to add info. over and over again when we launch app.
NSUserDefaults支持的數據類型有:NSNumber(NSInteger、float、double),NSString,NSDate,NSArray,NSDictionary,BOOL.
Ex. 例如,如果我想要存儲一個 NSMutableArray 對象,我必須先創建一個不可變數組(NSArray)再將它存入NSUserDefaults中去,代碼如下:
NSMutableArray *mutableArray = [NSMutableArray arrayWithObjects:@"123",@"234", nil];
    NSArray * array = [NSArray arrayWithArray:mutableArray];

    NSUserDefaults *user = [NSUserDefaults standardUserDefaults];
    [user setObject:array forKey:@"記住存放的一定是不可變的"];
 NSMutableArray *spaceObjectsAsPropertyLists = [[[NSUserDefaults standardUserDefaults] arrayForKey:ADDED_SPACEOBJECTS_KEY] mutableCopy];
    #mutableCopy: in order to transform it from an NSArray to an NSMutableArray.
    if (!spaceObjectsAsPropertyLists) {
        spaceObjectsAsPropertyLists = [[NSMutableArray alloc] init];
    }
    [spaceObjectsAsPropertyLists addObject:[self spaceObjectAsAPropertyList:spaceObject]];
    [[NSUserDefaults standardUserDefaults] setObject:spaceObjectsAsPropertyLists forKey:ADDED_SPACEOBJECTS_KEY];
    [[NSUserDefaults standardUserDefaults] synchronize]; 
    #save the mutableArray that we have just added.
在viewdidload中新增forloop讓原本就新增過的數據可以再打開APP後重現出來.
- (void)viewDidLoad
{
    [super viewDidLoad];

    NSArray *myPlanetsAsPropertyLists = [[NSUserDefaults standardUserDefaults] arrayForKey:ADDED_SPACEOBJECTS_KEY];
    for (NSDictionary *dictionary in myPlanetsAsPropertyLists) {
        CMSpaceObject *spaceObject = [self spaceObjectForDictionary:dictionary];
        [self.addedSpaceObjects addObject:spaceObject];
    }
- (CMSpaceObject *)spaceObjectForDictionary: (NSDictionary *)dictionary
{
    NSData *dataForImage = dictionary[PLANET_IMAGE];
    UIImage *spaceObjectImage = [UIImage imageWithData:dataForImage];
    CMSpaceObject *spaceObject = [[CMSpaceObject alloc] initWithData:dictionary andImage:spaceObjectImage];
    return spaceObject;
}

UIAlertViewController in iOS

在新版本的iOS中UIAlertView已經不支援了. 改為支援UIAlertViewController.
UIAlertController *alertController = [UIAlertController alertControllerWithTitle:@"Error" message:@"Username or password combination does not work" preferredStyle:UIAlertControllerStyleAlert];

        UIAlertAction *cancelAction = [UIAlertAction actionWithTitle:@"Cancel" style:UIAlertActionStyleCancel handler:nil];
        UIAlertAction *okAction = [UIAlertAction actionWithTitle:@"OK" style:UIAlertActionStyleDefault handler:nil];

        [alertController addAction:cancelAction];
        [alertController addAction:okAction];
        [self presentViewController:alertController animated:YES completion:nil];
enter image description here
參考資料:
1. http://fanli7.net/a/bianchengyuyan/C__/20140727/522751.html
2. http://stackoverflow.com/questions/28070015/dismissviewcontrolleranimated-does-not-work-within-a-block
3. http://www.cocoachina.com/ios/20141126/10320.html

2015年9月28日 星期一

iOS筆記:Implement Protocols

The way we passing the information back to a previous ViewController, we couldn’t create a property of ViewController B if i was coming from C. because we don’t wanna create a new instance of ViewController B, we anna use the instance ViewController B. so we want pass information back to that ViewController that’s still being held in memory.

First, need to reference that current ViewController. And the way to reference it, is using delegate property.

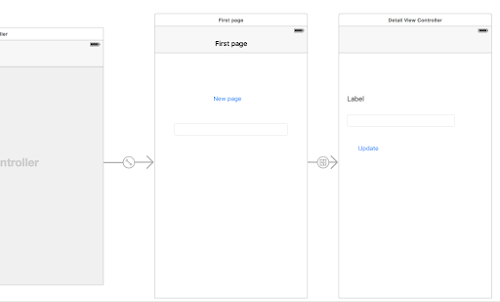
流程圖:
enter image description here

為一個類別定義一個協定,必須使用 @protocol 區段來定義它,它至少必須包含協定的名稱與協定的內容方法,協定名稱的命名方式,通常是以該類別的名稱加上 Delegate 來表示。

這個練習是要讓DetailViewController的資料可以傳到FirstPage (ViewController).

資料傳遞方向和 Segue 相反,所以在資料的傳送端建立 Protocol 而資料的接受端就是 delegate 的對像,就要實作傳送端的 Protocol 提到的 method 才可以收到資料。

enter image description here

# DetailViewController.h
#import <UIKit/UIKit.h>

@protocol DetailViewControllerDelegate <NSObject>
- (void)didUpdateText: (NSString *)text;
@end

@interface DetailViewController : UIViewController

@property (weak, nonatomic) id <DetailViewControllerDelegate> delegate;

....

@end

在定義協定之後,還必須定義它何時生效,就像合約都有生效日期一般,協定的生效位置則是定義在程式碼裡,並且生效的位置不應該在類別的建構式中,如果協定內同時定義許多方法,則可以在不同的位置,分別使它們生效。同樣我們在 Furnace 類別中宣告一個採納此協定的變數,採納協定的方法是使用角括號 <協定名稱> 來表示

@property (weak, nonatomic) id <DetailViewControllerDelegate> delegate;
//CMAddSpaceObjectViewControllerDelegate 是我們自訂的Delegate.

Why use weak??? because we wanna retain cycles. and be noted that if we creat delegate properties, we’re gonna declare them as weak. So that we’ll be able to propertly deallocate objects when we need to.

// DetailViewController.m

#import "DetailViewController.h"
@implementation DetailViewController

...

- (IBAction)updateButton:(id)sender {
    self.Label.text = self.textfield.text;
    [self.delegate didUpdateText:self.Label.text];
}
@end
//  ViewController.m
#import "ViewController.h"
#import "DetailViewController.h"

@implementation ViewController
- (void)viewDidLoad {
    [super viewDidLoad];
}
- (void)prepareForSegue:(UIStoryboardSegue *)segue sender:(id)sender
{
    if ([sender isKindOfClass:[UIButton class]]) {
        if ([segue.destinationViewController isKindOfClass:[DetailViewController class]])
        {
            DetailViewController *detailVC = segue.destinationViewController;
            detailVC.infomationFromTextField = self.textField.text;
            **detailVC.delegate = self;**
        }
    }
}

#pragma Delegate
- (void)didUpdateText:(NSString *)text
{
    self.textField.text = text;
}
@end

protocol本身也可以像一般類別的繼承.

@protocol A
-(void) methodA;
@end

@protocol B <A>
-(void) methodB;
@end

如果你要實作protocol B,則methodA跟methodB都需要實作。

The way to make keyboard go away when we press return key.

Use UITextFieldDelegate

- (BOOL)textFieldShouldReturn:(UITextField *)textField
{
    [self.textField resignFirstResponder];
    return YES;
}

參考網址:
1. http://furnacedigital.blogspot.tw/2012/01/protocol.html

2015年9月26日 星期六

iOS筆記:Delegate and DataSource

委任(delegatation):

Delegation is a simple and powerful pattern in which one object in a program acts on behalf of, or in coordination with, another object. The delegating object keeps a reference to the other object—the delegate—and at the appropriate time sends a message to it. The message informs the delegate of an event that the delegating object is about to handle or has just handled. The delegate may respond to the message by updating the appearance or state of itself or other objects in the application, and in some cases it can return a value that affects how an impending event is handled. The main value of delegation is that it allows you to easily customize the behavior of several objects in one central object.

資料來源(data scorce):

A data source is almost identical to a delegate. The difference is in the relationship with the delegating object. Instead of being delegated control of the user interface, a data source is delegated control of data. The delegating object, typically a view object such as a table view, holds a reference to its data source and occasionally asks it for the data it should display. A data source, like a delegate, must adopt a protocol and implement at minimum the required methods of that protocol. Data sources are responsible for managing the memory of the model objects they give to the delegating view.

Delegation,委任是拜託別人做事,講白一點就是自己不想做或不會做,所以外包出去叫別人做。
要判斷對方是否有「能力」來接受我的委任,就是問這個被委任的人是否有符合(Conform)我訂的條件(Protocol),然後這個條件就跟面試新人一樣,某些技能是必須的(Required),但其它條件是非必須的(Optional)。

C# 中使用 events 在做的事情,在 Objective-C 中,我們往往使用 target/action 與 delegate 實作。
在網路上看到的一個例子

假如”我”的本職工作之一是「接電話」,但”我”發現太忙了或來電太雜了,於是我聘請一位”秘書”分擔我「接電話」的工作,如果電話是老闆打來的,就讓「秘書」將電話轉接給「我」。。。

那麼,「我」就是A Object. 「秘書」就是”我”的「Delegate」。寫成代碼就是 – [我 setDelegate:秘書];

enter image description here

範例

為”ViewController”加上”UITableViewDataSource” protocol協定,以擁有載入資料至UITableView的能力。

The UITableView‘s dataSource and delegate.!
The delegate is used to control how the table is displayed.!
The dataSource provides the data what is displayed inside the cells.!

1.1 為”ViewController”加上”UITableViewDataSource” protocol協定,於UIViewController後方加上"<UITableViewDataSource>"

    @interface ViewController : UIViewController <UITableViewDataSource> 
    @end 

1.2 於”ViewController.m”檔中實作 “– tableView:numberOfRowsInSection:”方法,以回傳資料的列數,在此回傳3,表示3列資料。

     - (NSInteger)tableView:(UITableView *)tableView 
       numberOfRowsInSection:(NSInteger)section
     {
          //回傳3,表示有3筆資料   
          return 3; 
     }

1.3 於”ViewController.m”檔中實作 “– tableView:cellForRowAtIndexPath:”方法,以依照列數回傳UITableViewCell物件,而UITableViewCell物件即是UITableView用來顯示一筆資料的物件。在此建立UITableViewCell物件,透過indexPath的row屬性取得列數,並轉成字串設定給UITableViewCell,最後回傳cell物件,以供UITabelView顯示於畫面上(在此為了更容易了解程式,以直接建立UITableView的方式取得cell物件,正確的寫法應是可將同性質的UITableViewCell拿來重複使用才對)。

      - (UITableViewCell *)tableView:(UITableView *)tableView 
               cellForRowAtIndexPath:(NSIndexPath *)indexPath 
      {

          //建立UITableViewCell物件
          UITableViewCell *cell = [[UITableViewCell alloc] init]; 

          //依indexPath的row屬性取得目前所在的列數, 
          //並透過NSString的initWithFormat將int轉換為字串。
          NSString *rowNumber = [[NSString alloc] initWithFormat:@"%i", [indexPath row] ]; 

          //UITableViewCell有個屬性為textLabel, 
          //其是⼀一個UILabel物件, 
          //透過setText可設定其顯示的字樣 
          [cell.textLabel setText:rowNumber]; 

          //回傳cell物件,以供UITableView顯示在畫面上 
          return cell;
       } 

第2步:將實作”UITableViewDataSource”的ViewController(self),指派至UIViewTable的dataSource屬性中,好將UITableView取得資料的工作委派給ViewController(self)物件。當然,UITableView則會以”UITableViewDataSource”protocol協定向ViewController物件要資料。

- (void)viewDidLoad { 
    [super viewDidLoad]; 

    //將實作UIViewTableDataSourceViewController(self), 
    //指派給UITable的dataSource屬性中, 
    //好將UITableView取得資料的工作, 
    //委派給ViewController(self)物件。 
    self.tableView.dataSource = self; 
} 

第3步:執行,這時畫面上會出現3筆資料,而資料則是以委派的方法,委派給實作”UITableViewDataSource”protocol協定的ViewController物件所提供的。

Datasource VS Delegate

[Datasource]
1.Picker view 會問 datasource 它該如何表現
2.datasource 會告訴他你有 9欄的數量需要show 在 iphone 手機的 picker view 中

=> datasource 提供 picker view 如何展示它的資料內容。
換成通稱則為…

小結:datasource 會以控制項(picker view )預期的格式,提供給控制項(picker view)所需要的資訊 (9欄要show)。

[Delegate]
“當”使用者選取某個picker view 中的某個值後….

a.”當” 事情發生時,picker view 會告訴他的delegate。ex: user 選了第三列….
b. delegate 要準備對這個行為作反應。
(至於要怎麼做,我們先不管,所以圖中的b. 停在delegate 的框中,正準備要做反應。)

Protocols and Delegate

enter image description here

參考資料:
1. https://developer.apple.com/library/ios/documentation/General/Conceptual/DevPedia-CocoaCore/Delegation.html
2. http://blog.eddie.com.tw/2013/05/24/delegation-in-objective-c/
3. http://lokanghung.blogspot.tw/2013/06/ios-delegate-protocol.html
4. http://codex.wiki/post/125658-431

2015年9月22日 星期二

Github - Permission denied (publickey)

主要我是參考這個步驟完成設定的:
https://help.github.com/articles/generating-ssh-keys/

Step 1: Check for SSH keys

First, we need to check for existing SSH keys on your computer. Open Terminal and enter:
$ ls -al ~/.ssh
Lists the files in your .ssh directory, if they exist
If you see an existing public and private key pair listed (for example id_rsa.pub and id_rsa) that you would like to use to connect to GitHub, you can skip Step 2 and go straight to Step 3.
Tip: If you receive an error that ~/.ssh doesn’t exist, don’t worry! We’ll create it in Step 2.

Step 2: Generate a new SSH key

Make sure you substitute in your GitHub email address.
$ ssh-keygen -t rsa -b 4096 -C "your_email@example.com"
# Creates a new ssh key, using the provided email as a label
# Generating public/private rsa key pair.
Just press Enter to continue.
Enter file in which to save the key (/Users/you/.ssh/id_rsa): [Press enter]
You’ll be asked to enter a passphrase.
Enter passphrase (empty for no passphrase): [Type a passphrase]
Enter same passphrase again: [Type passphrase again]
After you enter a passphrase, you’ll be given the fingerprint of your SSH key.
Your identification has been saved in /Users/you/.ssh/id_rsa.
Your public key has been saved in /Users/you/.ssh/id_rsa.pub.
The key fingerprint is:
01:0f:f4:3b:ca:85:d6:17:a1:7d:f0:68:9d:f0:a2:db your_email@example.com

Step 3: Add your key to the ssh-agent

To configure the ssh-agent program to use your SSH key:
Ensure ssh-agent is enabled:
#start the ssh-agent in the background
$ eval "$(ssh-agent -s)"
Agent pid 59566
Add your SSH key to the ssh-agent:
ssh-add ~/.ssh/id_rsa

Step 4: Add your SSH key to your account

To configure your GitHub account to use your SSH key:
pbcopy < ~/.ssh/id_rsa.pub
#Copies the contents of the id_rsa.pub file to your clipboard
In github setting, click “SSH keys” to add a new SSH public key which generated by step 2.
enter image description here

Step 5: Test the connection

To make sure everything is working, you’ll now try to SSH into GitHub. When you do this, you will be asked to authenticate this action using your password, which is the SSH key passphrase you created earlier.
Open Terminal and enter:
$ ssh -T git@github.com
# Attempts to ssh to GitHub
You may see this warning:
The authenticity of host 'github.com (207.97.227.239)' can't be established.
RSA key fingerprint is 16:27:ac:a5:76:28:2d:36:63:1b:56:4d:eb:df:a6:48.
Are you sure you want to continue connecting (yes/no)?
Verify the fingerprint in the message you see matches the following message, then type yes:
Hi username! You've successfully authenticated, but GitHub does not
provide shell access.
If the username in the message is yours, you’ve successfully set up your SSH key
參考網址:
http://kirk.vangorkom.org/github-permission-denied-publickey-error-work/
https://help.github.com/articles/generating-ssh-keys/

2015年9月4日 星期五

iOS筆記:雜記 (1)

NSDictionary

只能存放OBJECT.
enter image description here

// 透過KEY去取值
NSString *BlueString = [myDictionary objectForKey:@"ocean color"];

NSNumber

NSNumber *number = [NSNumber numberWithInt:5];
NSLog(@"%@", number); //5

上述範例也等於 @5. This is a shorthand for creating a NSNumber object.

define

#define PLANET_NAME @"Planet Name"

PLANET_NAME : @"Mercury"

Literals

enter image description here

enter image description here

Class Method

enter image description here

曾經遇到的問題:
‘NSInternalInconsistencyException’, reason: ‘-[UITableViewController loadView] loaded the “vXZ-lx-hvc-view-kh9-bI-dsS” nib but didn’t get a UITableView.’

解法:changing your @interface SearchViewController : UITableViewController to @interface SearchViewController : UIViewController

Dismissing ViewControllers

When Using a push segue, we can use the method popViewController if have multiple ViewControllers.
And if we have a modal segue, that can pop or remove a single ViewController from our stack by using the method dismissViewController.

[self dismissViewControllerAnimated:YES completion:nil]`;

[self.navigationController popViewControllerAnimated:YES];

參考資料:
1. http://stackoverflow.com/questions/20234875/loaded-the-nib-but-didnt-get-a-uitableview?lq=1
2. http://www.slideshare.net/sysheen/ios-25194974 (初學者教學)

2015年9月2日 星期三

iOS筆記:MVC & lazy instantiation & Blocks

MVC (Model-View-Controller)

MVC 之所以重要在於 iOS 的所有設計都遵循著 Model-View-Controller 的設計原則.

Model – App 中所有的資料, Data (通訊錄 App 裡的所有聯絡人)
View – 所有使用者看得到的畫面 (ex. UILabel…)
Controller – 如何利用 Model 來呈現畫面 (View) 的所有邏輯

enter image description here

從上圖
雙黃線 – 禁止 Model 與 View 直接間接的接觸
白色虛實線 – Controller 可以直接一手跟 Model 拿資料,另一手命令 View 做事;但 Model 與 View 卻不能直接與 Controller 溝通,只能透過間接的方式委曲求全。

在 iOS 開發過程中,View 和 Model 會透過何種間接的方式與 Controller 做溝通。
View 有三種方式。
1. Action – Target :Controller 明白告訴 View「事情發生的時候,你可以做 action,action 的行為內容請找 target 要」。而這個 target 通常是 Controller。
2. Delegate:Controller 指派一個隨從 (delegate) 給 View,這個隨從會處理N件事,遇到這些事請通報他。這個隨從通常也是 Controller。
3. DataSource:Controller 指派一個倉管 (dataSource) 給 View,這個倉管可以提供部分資訊來源,需要索取這些資料請叫他。這個倉管也往往是 Controller (笑)。

Model 只有一種。
1. Notification & KVO:Model 透過主動廣播的方式,讓 Controller 知道資料有所變更;背後的運作原理是透過 KVO 的方式 (Key-Value Observing),當 Model 廣播的訊息帶有某個 Key 值,而這個 Key 值列在 Controller 的觀察名單內時,Controller 就會收到資料更新的訊息,接著可以做相對應的處理動作。

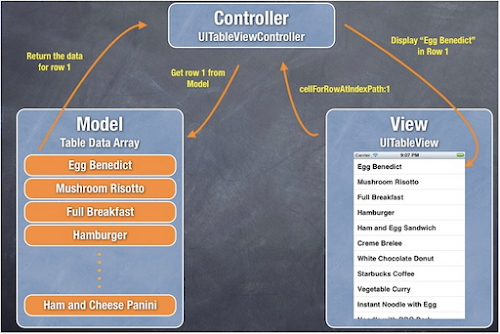
MVC Model Illustrated Using Simple Table as Example

The app displays a list of recipes in the table view. If you turn the concept into visual representation, here is how the table data is displayed:

enter image description here

The recipe information that are stored in separate array objects is the Model. Each table row maps to an element of the recipe arrays. The UITableView object is the View that is the interface to be seen by the user. It’s responsible for all the visuals (e.g. color of the table rows, font size and type). The TableViewController acts as the bridge between the TableView and Recipe data model. When display table data, UITableView actually asks the Controller for the data to display, that in turn, picks the data from the model.

lazy instantiation

Waiting until last second to instantiate something that you need.
當你真的需要使用,才真的會分配(記憶體)給你使用.
在什麼時候你會需要使用? 如果你的變數的值,是需要等到物件初始化完成後才能明確的定義,這時你就會需要.

@property (nonatomic, strong) NSMutableArray *players;

- (NSMutableArray *)players {
    if (!_players) {
        _players = [[NSMutableArray alloc] init];
    }
    return _players;
}

Blocks

ReturnType (^blockName)(Parameters)

int (^WeAreBlocks) (int) = ^(int number) {return number*3}

第一個 int,如同我們宣告函式一樣,我們宣告 WeAreBlocks 這個 Block 變數的回傳值是int型態。接下來括弧內我們指定 Block 的名稱為 WeAreBlocks,其中一個最重要的符號是 ^ 這是告訴編譯器我要宣告 WeAreBlocks 為這個 Block 的名稱。第三個在括弧內的 int 為提供給 Block 的參數。

接著到等號的右邊,先使用 Block 的宣告符號 ^,在接下來的括弧內宣告型態及變數,而這個變數是當做提供給後方大括弧內的程式碼所使用的輸入參數。最後大括弧內含的即為這個 Block 的所運行的程式碼。

Blocks are objects, so they can be stored to NSArray or NSDictionary data structures, as well as to be returned from methods, even to be assigned to variables. Blocks have two great features:

  1. They can be executed in a later time, and not when the code of the scope they have been implemented is being executed.
  2. Their usage leads eventually to a much cleaner and tidier code writing, as they can be used instead of delegate methods, written just in one place and not spread to many files.

A block can be declared as a class member variable.

@interface ViewController ()
@property (nonatomic, strong) NSString *(^blockAsAMemberVar)(void);
@end

// … and then inside the viewDidLoad add this
_blockAsAMemberVar = ^(void){
        return @"This block is declared as a member variable!";
    };

參考:
http://www.sappmemo.com/2012/08/13/181/ios-tutorial-1-on-the-ios-mvc-model-view-controller/
http://mikebuss.com/2014/06/22/lazy-initialization-swift/
http://www.appcoda.com/objective-c-blocks-tutorial/
http://popcornylu.blogspot.tw/2011/08/objective-c-block.html