2015年7月30日 星期四

iOS筆記:Core Location & MapKit(1)

Framework for managing location and heading! No user-interface. Basic object is CLLocation

@propertys: coordinate, altitude, horizontal/verticalAccuracy, timestamp, speed, course!

基本宣告

@property (readonly) CLLocationCoordinate2D coordinate;
 typedef {
CLLocationDegrees latitude; # a double
CLLocationDegrees longitude; # a double 
} CLLocationCoordinate2D;

@property (readonly) CLLocationDistance altitude; # meters

The more accuracy you request, the more battery will be used!
Device “does its best” given a specified accuracy request.

How close to that latitude/longitude is the actual location?

@property (readonly) CLLocationAccuracy horizontalAccuracy; # in meters 
@property (readonly) CLLocationAccuracy verticalAccuracy; # in meters 

A negative value means the coordinate or altitude (respectively) is invalid.

kCLLocationAccuracyBestForNavigation // phone should be plugged in to power source
kCLLocationAccuracyBest
kCLLocationAccuracyNearestTenMeters
kCLLocationAccuracyHundredMeters
kCLLocationAccuracyKilometer
kCLLocationAccuracyThreeKilometers

@property (readonly) CLLocationSpeed speed; # in meters/second
@property (readonly) CLLocationDirection course; # in degrees, 0 is north, clockwise
@property (readonly) NSDate *timestamp;

- (CLLocationDistance)distanceFromLocation:(CLLocation *)otherLocation; // in meters

How do you get a CLLocation?

Almost always from a CLLocationManager (sent to you via its delegate).

General approach to using it:

  1. Check to see if the hardware you are on/user supports the kind of location updating you want.
  2. Create a CLLocationManager instance and set the delegate to receive updates.
  3. Configure the manager according to what kind of location updating you want.
  4. Start the manager monitoring for location changes.

Checking to see what your hardware can do!
+ (CLAuthorizationStatus)authorizationStatus; // Authorized, Denied or Restricted (parental, enterprise)
+ (BOOL)locationServicesEnabled; // user has enabled (or not) location services for your application
+ (BOOL)significantLocationChangeMonitoringAvailable;
+ (BOOL)isMonitoringAvailableForClass:(Class)regionClass; //[CLBeacon/CLCircularRegionclass]
+ (BOOL)isRangingAvailable; // device can tell how far it is from beacons!

You can also limit updates to only occurring if the change in location exceeds a certain distance .

@property CLLocationDistance distanceFilter;

Starting and stopping normal position monitoring!

- (void)startUpdatingLocation;
- (void)stopUpdatingLocation;

Be sure to turn updating off when your application is not going to consume the changes!!
Get notified via the CLLocationManager’s delegate! -

(void)locationManager:(CLLocationManager *)manager
didUpdateLocations:(NSArray *)locations; # of CLLocation! 

Similar API for heading (CLHeading, et. al.)

It is possible to receive these kinds of updates in the background.

There are 2 ways to get location notifications.
1. Significant location change monitoring in CLLocationManager, this works even if your application is not running.You will get launched and your Application Delegate will receive the message!

- (void)startMonitoringSignificantLocationChanges;
- (void)stopMonitoringSignificantLocationChanges;

#function
application:didFinishLaunchingWithOptions: #with an options dictionary that will contain UIApplicationLaunchOptionsLocationKey
  1. Region-based location monitoring in CLLocationManager!
    一個圓形半徑的範圍, 如果用戶進入就會發送訊息.
- (void)startMonitoringForRegion:(CLRegion *)region; # CLCircularRegion/CLBeaconRegion - (void)stopMonitoringForRegion:(CLRegion *)region;

Get notified via the CLLocationManager’s delegate!

- (void)locationManager:(CLLocationManager *)manager didEnterRegion:(CLRegion *)region; 
- (void)locationManager:(CLLocationManager *)manager didExitRegion:(CLRegion *)region;
- (void)locationManager:(CLLocationManager *)manager monitoringDidFailForRegion:(CLRegion *)region
withError:(NSError *)error;

To be a beacon is a bit more involved!

Need to check out CBPeripheralManager (Core Bluetooth Framework).

Map Kit

User interface of location.
enter image description here

enter image description here

enter image description here

enter image description here

To use MKMapView: Create with alloc/init or drag from object palette in Xcode! Displays an array of objects which implement MKAnnotation

@property (readonly) NSArray *annotations; # contains id <MKAnnotation> objects ! 

MKAnnotation protocol

@protocol MKAnnotation <NSObject>
@property (readonly) CLLocationCoordinate2D coordinate;
@optional
@property (readonly) NSString *title; 
@property (readonly) NSString *subtitle;
@end

#require
typedef { 
    CLLocationDegrees latitude; 
    CLLocationDegrees longitude;
} CLLocationCoordinate2D;

Note that the annotations property is readonly, so …

@property (readonly) NSArray *annotations; # contains id <MKAnnotation> objects 

Must add/remove annotations explicitly

  • (void)addAnnotation:(id )annotation;
  • (void)addAnnotations:(NSArray *)annotations;
  • (void)removeAnnotation:(id )annotation;
  • (void)removeAnnotations:(NSArray *)annotations;

What happens when you touch on an annotation (e.g. the pin)?

Depends on the MKAnnotationView that is associated with the annotation (more on this later). By default, nothing happens, but if canShowCallout is YES in the MKAnnotationView, then
a little box will appear showing the annotation’s title and subtitle.
And this little box (the callout) can be enhanced with left/rightCalloutAccessoryViews.

How are MKAnnotationViews created & associated w/annotations?!

Very similar to UITableViewCells in a UITableView(CellForRowAtIndex 給section and row 就得到一個cell ).

enter image description here

Using didSelectAnnotationView: to load up callout accessories

- (void)mapView:(MKMapView *)sender didSelectAnnotationView:(MKAnnotationView *)aView 
{
    if ([aView.leftCalloutAccessoryView isKindOfClass:[UIImageView class]]) {
        UIImageView *imageView = (UIImageView *)aView.leftCalloutAccessoryView;
imageView.image = ...; 
#if you do this in a GCD queue, be careful, views are reused! 
    }
}

enter image description here

Controlling the region (part of the world) the map is displaying

@property MKCoordinateRegion region; 
typedef struct {
    CLLocationCoordinate2D center;
    MKCoordinateSpan span; 
} MKCoordinateRegion; 
typedef struct {
    CLLocationDegrees latitudeDelta;
    CLLocationDegrees longitudeDelta; 
}
- (void)setRegion:(MKCoordinateRegion)region animated:(BOOL)animated; # animate

This is a good place to “chain” animations to the map.!
When you display somewhere new in the map that is far away, zoom out, then back in.! This method will let you know when it’s finished zooming out, so you can then zoom in.

- (void)mapView:(MKMapView *)mapView didChangeRegionAnimated:(BOOL)animated;

MKLocalSearch: Searching for places in the world

Can search by “natural language” strings asynchronously (uses the network)

MKLocalSearchRequest *request = [[MKLocalSearchRequest alloc] init]; 
request.naturalLanguageQuery = @“Ike’s”;
request.region = ...;
MKLocalSearch *search = [[MKLocalSearch alloc] initWithRequest:request];
[search startWithCompletionHandler:^(MKLocalSearchResponse *response, NSError *error) {
  # response contains an array of MKMapItem which contains MKPlacemark 
}];

You can open one of these MapItem in the Maps app

- (BOOL)openInMapsWithLaunchOptions:(NSDictionary *)options; // options like region, show traffic

enter image description here

Add overlays to the MKMapView and it will later ask you for a renderer to draw the overlay.

- (void)addOverlay:(id <MKOverlay>)overlay level:(MKOverlayLevel)level;

Level is (currently) either AboveRoads or AboveLabels (over everything but annotation views).

- (void)removeOverlay:(id <MKOverlay>)overlay;

Built-in Overlays and Renderers for numerous shapes …

MKCircleRenderer
MKPolylineRenderer
MKPolygonRenderer
MKTileOverlayRenderer #can also be used to replace the map data from Apple

Embed Segues

Drag out a Container View from the object palette into the scene you want to embed it in. Automatically sets up an “Embed Segue” from container VC to the contained VC.

2015年7月29日 星期三

iOS筆記:UITableView (2)

Cell Type

enter image description here

如果TableView是屬於static cell的話, static means that these cells are set, up in the storyboard only, You can edit them however you want
including dragging butto

UITableView Protocols

UITableViewController
Automatically sets itself as its UITableView’s delegate & dataSource.!
Also has a property pointing to its UITableView:!

@property (nonatomic, strong) UITableView *tableView;
#(this property is actually == self.view in UITableViewController! 但我們不這樣用)

The delegate is used to control how the table is displayed. include what if someone touch the row, we want to react that, and how we arrange things.

The dataSource provides the data what is displayed inside the cells. 指的是TableView的內容(content), 從database出來要填入表格的數據.dataSource is a protocol to bring the model’s data into the View.

UITableViewDataSource

We have to implement these 3 to be a “dynamic” (arbitrary number of rows) table . static的tableView已經在storyboard中設置好了.

  1. How many sections in the table?
  2. How many rows in each section?
  3. Give me a UITableViewCell to use to draw each cell at a given row in a given section.
- (UITableViewCell *)tableView:(UITableView *)sender
         cellForRowAtIndexPath:(NSIndexPath *)indexPath
{
   #get a cell to use (instance of UITableViewCell)
   UITableViewCell *cell;
cell = [self.tableView dequeueReusableCellWithIdentifier:@“Flickr Photo Cell” forIndexPath:indexPath];                                         

   #dequeueReusableCell只創建會出現在螢幕上的行數,當往下滑TableView時, 離開螢幕的行會補到下面再次填上資料出現

   #set @propertys on the cell to prepare it to display
   ...
   return cell;
}

How does a dynamic table know how many rows there are?
Number of sections is 1 by default, if you don’t implement numberOfSectionsInTableView:, it will be 1.

- (NSInteger)numberOfSectionsInTableView:(UITableView *)sender; !
- (NSInteger)tableView:(UITableView *)sender numberOfRowsInSection:(NSInteger)section; 
#This is a required method in this protocol

What about a static table?

Do not implement these dataSource methods for a static table. UITableViewController will take care of that for you.

UITableViewDelegate.

負責如何顯示表格, 而不是任何關於顯示出來的數據內容.The delegate also lets you observe what the table view is doing.The classic “will/did” sorts of things.

- (void)tableView:(UITableView *)sender didSelectRowAtIndexPath:(NSIndexPath *)path ! {!
# go do something based on information about my Model! # corresponding to indexPath.row in indexPath.section
}

UITableView Segue

The sender of prepareForSegue:sender: is the UITableViewCell! Use the important method indexPathForCell:to find out the indexPath of the row that’s segueing.!

- (void)prepareForSegue:(UIStoryboardSegue *)segue sender:(id)sender
{
    NSIndexPath *indexPath = [self.tableView indexPathForCell:sender];
# prepare segue.destinationController to display based on information
# about my Model corresponding to indexPath.row in indexPath.section }

UITableView Spinner

當內容是透過網路加載的時候, 用spinner可以讓使用者知道正在透過其他queue下載資料.You get it via this property in UITableViewController.

@property (strong) UIRefreshControl *refreshControl;
# Start it with ...
- (void)beginRefreshing;
# Stop it with ...
- (void)endRefreshing;

enter image description here

What if your Model changes?

- (void)reloadData;
# 這會把整個資料重新更新會使程式變慢
- (void)reloadRowsAtIndexPaths:(NSArray *)indexPaths withRowAnimation:(UITableViewRowAnimation)animationStyle;
# 只更新有變化的部分

Universal Applications

The iPad has more screen real estate, so it can present MVCs in a couple of other ways.
enter image description here

UISplitViewController

enter image description here

@property (strong) UISplitViewController *splitViewController; !

The UISplitViewController has a property which is an array containing Master and Detail:

@property (copy) NSArray *viewControllers; 
# index 0 is Master, 1 is Detail!

UISplitViewControllerDelegete

You must set this delegate very early, probably in awakeFromNib.

e.g., UISplitViewController starts sending its delegate methods way before viewDidLoad.! And then, unfortunately, when its delegate methods get sent to you, your outlets aren’t set yet!! This can make being a UISplitViewController’s delegate a real pain.!

常使用的有:
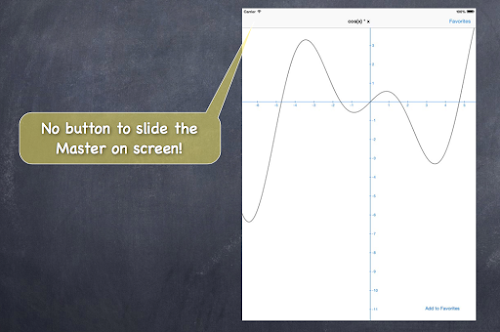
Never hide the left side (Master) behind a bar button

- (BOOL)splitViewController:(UISplitViewController *)sender shouldHideViewController:(UIViewController *)master
                 inOrientation:(UIInterfaceOrientation)orientation
{
return NO; // never hide it
}

Hide Master in portrait orientation only (the default)

- (BOOL)splitViewController:(UISplitViewController *)sender shouldHideViewController:(UIViewController *)master
                  inOrientation:(UIInterfaceOrientation)orientation
    {
        return UIInterfaceOrientationIsPortrait(orientation);
}

If you forget to set the delegate, you’ll get this …
enter image description here
This gets called in your delegate when the master gets hidden …

- (void)splitViewController:(UISplitViewController *)sender
     willHideViewController:(UIViewController *)master
          withBarButtonItem:(UIBarButtonItem *)barButtonItem
       forPopoverController:(UIPopoverController *)popover
{
barButtonItem.title = master.title;
# this next line would only work in the Detail
# and only if it was in a UINavigationController self.navigationItem.leftBarButton = barButtonItem;
}

This gets called in your delegate when the master reappears .

    - (void)splitViewController:(UISplitViewController *)sender
         willShowViewController:(UIViewController *)master
      invalidatingBarButtonItem:(UIBarButtonItem *)barButtonItem
    {
# this next line would only work in the Detail
# and only if it was in a UINavigationController self.navigationItem.leftBarButton = nil;
}

Updating the Detail when the Master is touched

  1. Target/Action!
    Example (code in the Master view controller)
  - (IBAction)doit
  {
      id detailViewController = self.splitViewController.viewControllers[1];
[detailViewController setSomeProperty:...]; 
# might want some Introspection first }
  1. Replace Segue (entirely replaces the Detail view controller)
    Segue 只會重新產生新的view, 而不會重新利用同一個view controller.

Popovers

Creating a Popover Segue in your Storyboard!

Just drag from the UI element you want to cause the popover to the scene you want to pop up. In your prepareForSegue:sender:, the argument will be isKindOf:UIStoryboardPopoverSegue.!
And UIStoryboardPopoverSegue has a @property you can use to get the UIPopoverController:
- (UIPopoverController *)popoverController;
Example:

- (void)prepareForSegue:(UIStoryboardSegue *)segue sender:(id)sender
{
    if ([segue isKindOfClass:[UIStoryboardPopoverSegue class]]) {
        UIPopoverController *popoverController =
            ((UIStoryboardPopoverSegue *)segue).popoverController;
...
} }

參考:
http://lokanghung.blogspot.tw/2013/06/ios-delegate-protocol.html

2015年7月23日 星期四

iOS筆記:Multithreading & UIScrollView

Multithreading

Queues

Multithreading is mostly about “queues” in iOS.! Blocks are lined up in a queue (method calls can also be enqueued). 排隊等著被執行, 有一次取出一個block的. 也有一次讓多個block同時執行,彼此之間還會share一些資訊.

Main queue

All UI activity MUST occur on this queue and this queue only.
平常不會將要執行很久的code放在main queue. 因為我們不想讓他被block住. 大部份UIKit的code you just call them only on the main queue. 如果在其他queue使用有可能不能正常運作(主要是指關於可以跟screem同步或是改變的操作).
enter image description here

dispatch_async V.S. dispatch_sync

async: return after task is added to queue.
sync: return after task is done.

Example of an iOS API that uses multithreading!

下載網路上某個URL對應的內容. 不會在main queue執行而是另一個queue, 因為怕要下載過長時間, 但下載完之後會通知.

NSURLRequest *request = [NSURLRequest requestWithURL:[NSURL urlWithString:@“http://...”]];
  NSURLConfiguration *configuration = ...;
  NSURLSession *session = ...;
  NSURLSessionDownloadTask *task;
  task = [session downloadTaskWithRequest:request
                 completionHandler:^(NSURL *localfile, NSURLResponse *response, NSError *error) {
         /* want to do UI things here, can I? */ 
}];
downloadTaskWithRequest:completionHandler: will do its work (downloading that URL)! NOT in the main thread (i.e. it will not block the UI while it waits on the network).
下面這兩個範例就是在說在main queue 跟不在main queue 的寫法.

On the main queue

delegate: 在下載時會向你更新狀態. 但我們只需要知道什麼時候結束去呼叫completionHandler, 所以這裡設定nil.
delegate queue: Tells which queue are all your delegate methods going to be called on. 也可以設定nil那系統會隨機分配一個queue.
Since the delegateQueue is the main queue, our completionHandler will be on the main queue.
enter image description here
When the URL is done downloading, the block above will execute on the main queue. Thus we can do any UI code we want there.!

Off the main queue

在這邊不是在main queue中被執行所以要在completionHandler另外新增block來指向main queue才能執行UI stuff.
enter image description here
Can’t do any UI stuff because the completionHandler is not on the main queue.! To do UI stuff, you have to post a block (or call a method) back on the main queue.

UIScrollView

Adding subviews to a UIScrollView

Ex.
scrollView.contentSize = CGSizeMake(3000, 2000); #代表scrollView可以滾動的範圍
subview2.frame = CGRectMake(50, 100, 2500, 1600); #(座標,大小)
[view addSubview:subview2];
enter image description here
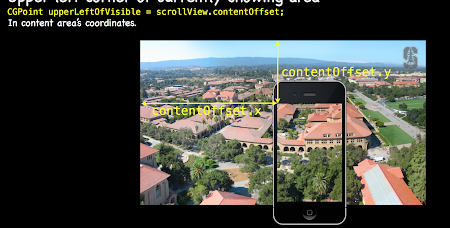
要怎麼知道現在在哪個區域?
CGPoint upperLeftOfVisible = scrollView.contentOffset;
enter image description here
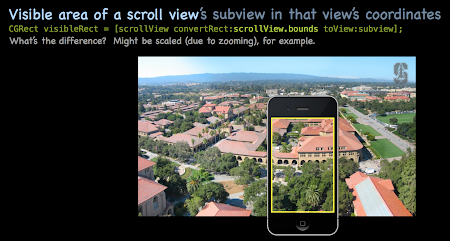
Visible area of a scroll view’s subview in that view’s coordinates
CGRect visibleRect = [scrollView convertRect:scrollView.bounds toView:subview];
enter image description here

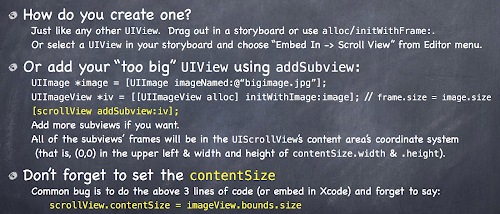
How do you create one?

enter image description here
建議使用addSubview
UIImage *image = [UIImage imageNamed:@“bigimage.jpg”];
UIImageView *iv = [[UIImageView alloc] initWithImage:image]; // frame.size = image.size! [scrollView addSubview:iv]; 

Scrolling programmatically!

- (void)scrollRectToVisible:(CGRect)aRect animated:(BOOL)animated; !

Zooming

Will not work without minimum/maximum zoom scale being set!
scrollView.minimumZoomScale = 0.5; // 0.5 means half its normal size 
scrollView.maximumZoomScale = 2.0; // 2.0 means twice its normal size!
Will not work without delegate method to specify view to zoom!
- (UIView *)viewForZoomingInScrollView:(UIScrollView *)sender;
If your scroll view only has one subview, you return it here. More than one? Up to you.!
enter image description here

Demo

ImageViewController.h
#import <UIKit/UIKit.h>
@interface ImageViewController : UIViewController
@property (nonatomic,strong) NSURL *imageURL;
@end
ImageViewController.m
設置一個spinner反饋
#import "ImageViewController.h"
@interface ImageViewController () <UIScrollViewDelegate>
@property (nonatomic,strong) UIImageView *imageView;
@property (nonatomic,strong) UIImage *image;
@property (strong, nonatomic) IBOutlet UIScrollView *scrollView;
@property (strong, nonatomic) IBOutlet UIActivityIndicatorView *spinner;
@end
[self.imageView sizeToFit]希望imageView能調整自身框架去fit圖像顯示
@implementation ImageViewController

- (void) viewDidLoad
{
    [super viewDidLoad];
    [self.scrollView addSubview:self.imageView]; #make sure get it on screen.
}

- (UIImageView *)ImageView
{
    if(!_imageView) _imageView = [[UIImageView alloc] init];
    return _imageView;
}

- (UIImage *)image
{
    return self.imageView.image;
}

- (void) setImage:(UIImage *)image
{
    self.imageView.image = image;
    [self.imageView sizeToFit]; 

    self.scrollView.contentSize = self.image ? self.image.size : CGSizeZero; 
#避免self.image為nil,否則會得到underfined results.
    [self.spinner stopAnimating];
}


- (void)setScrollView:(UIScrollView *)scrollView
{
    _scrollView = scrollView;
    _scrollView.minimumZoomScale = 0.2;
    _scrollView.maximumZoomScale = 1.5;
    _scrollView.delegate = self;

    self.scrollView.contentSize = self.image ? self.image.size : CGSizeZero; 
#當prepareForSegue在準備時,你的輸出還沒建立好,避免self.scrollView為nil.
}

- (UIView *)viewForZoomingInScrollView:(UIScrollView *)scrollView
{
    return self.imageView; 
    #設定要在哪個view發生zomming. 只會發生在這邊return的view上
}

- (void)setImageURL:(NSURL *)imageURL
{
    _imageURL = imageURL;
    #self.image = [UIImage imageWithData:[NSData dataWithContentsOfURL:self.imageURL]]; 
    #如果下載需要花時間 就會造成延誤因為在main queue執行.
    [self startDownloadingImage];
}

- (void)startDownloadingImage
{
    #下載時先清除當前的image內容
    self.image = nil; 
    if (self.imageURL) {
        [self.spinner startAnimating];

        NSURLRequest *request = [NSURLRequest requestWithURL:self.imageURL];
        NSURLSessionConfiguration *configuration = [NSURLSessionConfiguration ephemeralSessionConfiguration];
#another configuration option is backgroundSessionConfiguration, 很強大,即使離開app還會執行直到完成下載.
# create the session without specifying a queue to run completion handler on (thus, not main queue)
# we also don't specify a delegate (since completion handler is all we need)
        NSURLSession *session = [NSURLSession sessionWithConfiguration:configuration];
        NSURLSessionDownloadTask *task = [session downloadTaskWithRequest:request completionHandler:^(NSURL *localfile, NSURLResponse *response, NSError *error) {
             # this handler is not executing on the main queue, so we can't do UI directly here
            if (!error) {
 #避免在下載的同時,網址變了導致內容不一樣.
                if ([request.URL isEqual:self.imageURL]) {
                    UIImage *image = [UIImage imageWithData:[NSData dataWithContentsOfURL:localfile]];#從網頁下載圖
# but calling "self.image =" is definitely not an exception to that!
# so we must dispatch this back to the main queue
                    dispatch_async(dispatch_get_main_queue(), ^{ self.image = image; });
//[self performSelectorOnMainThread:@selector(setImage:) withObject:image waitUntilDone:NO]跟上一行結果一樣
                }
            }
        }];
        [task resume]; 
   # don't forget that all NSURLSession tasks start out suspended!
    }
}
@end
ViewController.m
#import "ViewController.h"
#import "ImageViewController.h"

@implementation ViewController

- (void) prepareForSegue:(UIStoryboardSegue *)segue sender:(id)sender
{
    if ([segue.destinationViewController isKindOfClass:[ImageViewController class]]) {
        ImageViewController *ivc = (ImageViewController *)segue.destinationViewController;
        ivc.imageURL = [NSURL URLWithString:[NSString stringWithFormat:@"http://images.apple.com/v/iphone-5s/gallery/a/images/download/%@.jpg", segue.identifier]];
        ivc.title = segue.identifier;
    }
}
@end
enter image description here
參考資料:
http://www.slideshare.net/deeplovepan/standford-2015-week6?related=5

iOS筆記:Auto Layout

利用規則來決定框架的位置

Way number one: Blue guideline suggested constraints.

常見的使用方式是搭配對其的藍色線,但只有藍色線是不夠的, 因為這些blue line是告訴Xcode你想要什麼, 但還必須要告訴Xcode為我執行這些規則 or Contraints. 這邊選擇使用Reset to Suggest Contraints
enter image description here

在視圖中設定完約束條件之後,約束線(constraint line)不是以橘色就是藍色來呈現。橘色約束線表示目前的約束條件不足,你必須要去修正它。

出現藍色的約束條件,表示你的佈局已經正確的設定,沒有其他模糊不清的情況。
enter image description here

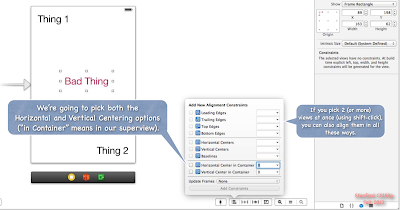
Way number two: Use the little menu at the button.

  • Align – 建立一個對齊的約束條件,例如對齊兩個視圖的左側。
  • Pin – 建立間距約束條件,例如定義一個UI控制的寬度。
  • Issues – 解決佈局問題。
    enter image description here

用來設置對齊
enter image description here

可以透過以下的方式自動對齊.
enter image description here

當你對已經約束的物件進行移動時,它的約束並不會變. 如下圖所示
enter image description here

Way number three: To control drag.

Apple讓開發者可以更彈性使用Control加上拖曳來設定Auto Layout,你只要從任何視圖按住control鍵不放,然後拖曳來設定相互間的約束條件即可。當你將滑鼠放開,它會呈現一個相關約束條件列表來讓你選取。
enter image description here

按住Shift就可以多選
enter image description here

也可以control-drag to superview 就會出現跟上面不一樣的選項. or can control-drag to it self 也會有一個不一樣的選項.
enter image description here

參考:
Standford CS193P Lecture 9.
http://www.appcoda.com.tw/introduction-auto-layout/

2015年7月19日 星期日

Python Django:Dinbendon(3)

用戶

django.contrib套件中的auth app,有內建了user的模型。

/mysite/settings.py
...
INSTALLED_APPS = (
    'django.contrib.admin',
    'django.contrib.auth',  # 確認此行有加

...
)

MIDDLEWARE_CLASSES = (
    'django.contrib.sessions.middleware.SessionMiddleware',
    ...
    'django.contrib.auth.middleware.AuthenticationMiddleware',  # 確認此行有加

    ...
)
...

有了auth,就等於有了一個內建的用戶權限系統,可以進入admin後端看看,我們會發現有使用者和群組這兩個屬於auth應用的model,包含了使用者的名稱、姓氏、名字、電子郵箱和工作人員狀態等欄位。

a. auth.athenticate負責進行用戶的認證
b. auth.login負責進行用戶登入狀態的保持

登入與登出

自訂login & logged out

#.../Dinbendon/views.py
from django.contrib import auth  # 別忘了import auth

...
def login(request):

    if request.user.is_authenticated(): 
        return HttpResponseRedirect('/index/')

    username = request.POST.get('username', '')
    password = request.POST.get('password', '')

    user = auth.authenticate(username=username, password=password)

    if user is not None and user.is_active:
        auth.login(request, user)
        return HttpResponseRedirect('/index/')
    else:
        return render_to_response('login.html')

def logout(request):
    auth.logout(request)
    return HttpResponseRedirect('/index/')

視圖函式login包含幾個重要的部份,首先,我們可以發現HttpRequest物件中包含了一個user屬性,他代表了當前的使用者。

如果用戶已經登入,則HttpRequest.user是一個User物件,也就是具名用戶。
如果使用者尚未登入,HttpRequest.user是一個AnonymousUser物件,也就是匿名用戶。

對AnonymousUser來說,is_authenticated方法會返回一個False值,而User會拿到True,所以is_authenticated方法是用來判定當下的使用者是否認證過(比對過身份)的重要函式。

使用django.contrib.auth.views中的login和logout函式

auth.logout方法會將用戶登出,然後跟login函式一樣,我們要記得在views.py中,從django.contrib中匯入auth。

#.../Dinbendon/views.py
# -*- coding: utf-8 -*-
from django.shortcuts import render_to_response
from django.contrib import auth

def welcome(request):
    if 'user_name' in request.GET:
        return HttpResponse('Welcome!~'+request.GET['user_name'])
    else:
        return render_to_response('welcome.html',locals())

def index(request):
    return render_to_response('index.html',locals())
#.../Dinebndon/urls.py
...
from Dinbendon.views import welcome, index
from django.contrib.auth.views import login, logout  # 利用內建的view funciton

...
urlpatterns = patterns('',
...
    url(r'^accounts/login/$',login),
    url(r'^accounts/logout/$',logout),
    url(r'^index/$',index),
)

為何需要使用/accounts/login/這個pattern,選擇/login/不是更簡單嗎?

這是因為/accounts/login/是Django默認的登入pattern(/accounts/logout/也是默認值),這個pattern對於某些Django的函式而言是參數的預設值,使用默認的pattern可以使得我們再使用到這些函式時減少一些負擔,不過若沒有這些顧慮的話,使用任何想要的pattern都是可以的。
可以透過settins.py來設定此一默認值,LOGIN_URL可以修改成任意想要的默認pattern。

這兩個視圖函式預設使用的模版是registration/login.html和registration/logged_out.html. 先新增一個registration目錄到templates底下.

login函式在最後會呼叫registration/login.html模版,而提供給模版的主要有下列變量(另外還有site和site_name):

變量 說明
form AuthenticationForm的物件: 用來做authenticate的確認的,有username和password兩個欄位
next: 用在登入成功後重導的URL,可能包含查詢字串

其實next只是個預設的名稱,透過設定settings.py中的REDIRECT_FIELD_NAME可以設定成任意的字串。

#.../Dinbendon/templates/registration/login.html

<!DOCTYPE html>
<html>
<head>
    <title>index</title>
</head>
<body>
        {% if form.errors %}
        <p>Your username and password didn't match. Please try again.</p>
    {% endif %}

    <form method="post" action="{% url 'django.contrib.auth.views.login' %}">
        {% csrf_token %}
        <table>
            <tr>
                <td>{{ form.username.label_tag }}</td>
                <td>{{ form.username }}</td>
            </tr>
            <tr>
                <td>{{ form.password.label_tag }}</td>
                <td>{{ form.password }}</td>
            </tr>
        </table>

        <input type="submit" value="login" />
    </form>
    </body>
</html>

對於登出來說,我們也可以撰寫一個相應的模版,如果沒有設定,Django預設會用admin的登出頁面作為登出頁面。

提供重導URL給內建login

登入之後要將使用者帶至某個特定的頁面(也許是首頁,也許是登入前的頁面),為了讓內建的login能夠照我們的意思來重導,我們必須提供重導URL給login.
法一:
於settings.py中設定LOGIN_REDIRECT_URL

#.../Dinbendon/settings.py
...
LOGIN_REDIRECT_URL = "/index/"

法二:
透過POST方法傳送next(或是其他的REDIRECT_FIELD_NAME)欄位及其值

#.../templates/registration/login.html
...
        <input type="submit" value="login" />
        <input type="hidden" name="next" value="{{ next }}" />  # 利用此行
    </form>
...

使用hidden type的input元件,有個點要注意, 我們利用名為next的隱藏元件來傳送重導URL,而這個URL卻是來自login函式提供的變量{{ next }}
法三:
透過GET方法傳送next(或是其他的REDIRECT_FIELD_NAME)欄位及其值.
透過URL pattern/accounts/login/?next=/index/中的查詢字串來提供next欄位。

權限與註冊

匿名用戶 vs. 具名用戶,關鍵就在於對HttpRequest物件的user屬性進行is_authenticated的判斷。透過is_authenticated方法,我們能很容易地判定當下的使用者是匿名或是具名,詳細的作法有三.

enter image description here
第一種方法雖然我們的確可以在模版中透過判定用戶的登入決定要顯示哪些資訊或連結,但我們無法阻止使用者透過GET方法直接存取某些頁面。舉例來說,用戶未登入前無法由首頁獲得餐廳列表的超連結,但是如果我們利用URLpattern/restaurants_list/還是可以進入餐廳列表的頁面。

第二種方法,是在視圖函式中先用is_authenticated進行判斷,如果發現是匿名用戶,則馬上將其重導到其他頁面,或是回應以一個錯誤訊息的頁面。

#.../restaurants/views.py
...
def list_restaurants(request):
    if not request.user.is_authenticated():
        return HttpResponseRedirect('/accounts/login/?next={0}'.format(request.path))
    restaurants = Restaurant.objects.all()
    return render_to_response('restaurants_list.html',locals())
...
return HttpResponseRedirect('/accounts/login/?next={0}'.format(request.path))
#也可以寫成以下的方式,但為了不把程式寫死,還是上面這樣的寫法比較妥當.
return HttpResponseRedirect('/index/')
# or
return render_to_response('error.html')  # 一樣要記得此模版要放置在正確的templates路徑下

這裡用到前面講到的利用GET方法傳遞next欄位的技術,讓使用者成功登入後可以重導至next欄位的URL,這裡我們希望重導到的頁面就是餐廳列表的url pattern:/restaurants_list/,我們發揮不寫死的精神,使用request.path來提供該url pattern。

Django提供我們一種快捷的作法,那就是法三:使用login_required修飾符。

#.../restaurants/views.py
...
from django.contrib.auth.decorators import login_required  # 記得import進來!
from django.http import HttpResponse, HttpResponseRedirect
...
@login_required
def list_restaurants(request):
    restaurants = Restaurant.objects.all()
    return render_to_response('restaurants_list.html',locals())
...

@login_required會檢查使用者是否登入,若已登入,正常執行修飾的視圖函式,反之會重導至/accounts/login/,並附上一個查詢字串,以該頁面的URL作為查詢字串中next欄位的值。

@login_required也使用了默認的登入URL pattern “/accounts/login/”

真正好的設計,應該是結合法1和法3,直觀上讓匿名用戶不會誤入登入限定的頁面,也避免了有心人士想透過URL直接存取頁面。

如何使用代碼來進行註冊而非使用admin。

註冊用戶:
需要一個處理註冊的視圖函式和一個註冊用的頁面,當然還有最重要的,用來註冊的表單。這邊用Django中auth應用中內建的註冊表單模型UserCreationForm.

#.../Dinbendon/views.py
...
from django.contrib.auth.forms import UserCreationForm
...
def register(request):
    if request.method == 'POST':
        form = UserCreationForm(request.POST)
        if form.is_valid():
            user = form.save()
            return HttpResponseRedirect('/accounts/login/')
    else:
        form = UserCreationForm()
    return render_to_response('register.html',locals())

UserCreationForm是繼承自forms.ModelForm的表單模型,ModelForm是一種特殊形式的表單,當我們發現表單欄位與某資料庫模型的欄位相同時(通常會發生在該表單的填寫就是為了產生某資料庫模型的物件),我們可以使用ModelForm避免一些不必要的手續,此處我們並不打算深入探究自定義ModelForm的寫法,我們只要了解如何從ModelForm產生一個資料庫模型的物件並且將之存入資料庫。

UserCreationForm主要有兩個步驟:

  1. 填入欄位資料並創造表單物件
  2. 使用save方法以表單中的內容生成資料並存入資料庫

我們將request.POST這個類字典當做引數(當然裡面包含了該表單所需的各個欄位內容:帳號跟密碼)來生成一個表單物件form,在驗證了內容的合法性後,使用save方法生成一個User物件並存入database,最後重導回/accounts/login/讓通過註冊的用戶可以立即登入網站。

接著是註冊頁面的撰寫,我們選擇了form的as_p方法來生成表單

#../Dinbendon/templates/register.html

<!DOCTYPE html>
<html>
<head>
    <title></title>
</head>
 <body>
        <h1>註冊新帳號</h1>

        <form action="" method="post">
            {{ form.as_p }}
            <input type="submit" value="註冊">
        </form>
    </body>
</html>
#.../Dinbendon/urls.py
...
from Dinbendon.views import welcome, index, register
...
urlpatterns = patterns('',
...
    url(r'^accounts/register/$',register),
)

最後透過index.html來增加註冊這個超連結選項

#.../Dinbendon/templates/index.html
...
    <body>
        <h2>歡迎來到餐廳王</h2> <p><a href="/accounts/register/">註冊</a></p>
        {% if request.user.is_authenticated %}
...

權限

權限(Permission)也是一種Django內建的模型,主要包含了三個欄位如下.

name: 權限名稱
codename: 實際運用在代碼中的權限名稱
content_type: 來自一個模型的content_type

codename是實際運用在判定權限代碼中的名字,有點類似一個用戶的帳號,而name就好像是用戶名稱,通常只是拿來顯示,好閱讀的。每一個權限都會跟一個資料庫模型綁定,都會屬於一種資料庫模型,這也是需要content_type的原因。

新增權限有兩種方式,一種透過各資料庫模型中的Meta Class來設定,另外一種可以透過操作Permission模型來建立新物件.

使用Meta Class來新增權限

#.../restaurants/models.py
...
class Comment(models.Model):
    ...
    class Meta:
        ordering = ['date_time']
        permissions = (
            ("can_comment", "Can comment"),  # 只有一個權限時,千萬不要忘了逗號!
        )

permissions變數是一個元組,我們可以為該模型增加一至數種權限,而該組的每個元素又是一個有兩元素的元組,第一個元素是codename字串,第二個元素是name字串,至於不需要content_type的原因很簡單,我們在模型下直接定義了權限,content_type會由Django自動地默默幫我們取得。

權限的新增、移除與判定

對某用戶新增與移除權限最快的方式就是利用admin後台,如果是在python shell中,可以用User.user_permissions.add和User.user_permisssions.remove來為某個使用者新增或刪除一個權限,也可以用User.has_perm來查看使用者是否具備某種權限,但有一點很弔詭,經過測試之後發現,若沒有向管理器重新取得User物件的話,has_perm無法反應即刻性的結果。

使用權限

enter image description here

但為了方便,通常我們會利用admin後台來管理群組及其權限。
Ex.

#mysite/restaurants/
...
        <table>
            <tr>
                <th>選取</th>
                <th>店名</th>
                <th>電話</th>
                <th>地址</th>
                {% if perms.restaurants.can_comment %}
                    <th>評價</th>
                {% endif %}
            </tr>
            {% for r in restaurants %}
                <tr>
                    <!-- <td> <input type="radio" name="id" value="{{r.id}}"> </td> -->
                    <td> <a href="/menu/{{r.id}}/"> menu </a> </td>
                    <td> {{ r.name }} </td>
                    <td> {{ r.phone_number }} </td>
                    <td> {{ r.address }} </td>
                    {% if perms.restaurants.can_comment %}
                        <td> <a href="/comment/{{r.id}}/"> comment </a> </td>
                    {% endif %}
                </tr>
            {% endfor %}
        </table>
...

這裡使用的是{{perms}}這個變量,我們知道一個變量之所以可以用來填寫模板,必須要含在context中並傳給模板。我們偷懶通常會用locals函數。那在這裡一樣,{{perms}}不可能會憑空出世,我們得要將當下使用者的各種權限含在context中並且傳給模板才能使用。但這顯然花功夫,Django其實已經提供了這種處理的機制,只要我們使用包含了HttpRequest物件的context就可以,而這樣的context,在Django中是一個內建的context子類別: RequestContext

我們直接來看看如何使用RequestContext:

#mysite/restaurants/views.py
...
from django.template import RequestContext
...
@login_required
def list_restaurants(request):
    restaurants = Restaurant.objects.all()
    print request.user.user_permissions.all()
    return render_to_response('restaurants_list.html',
                               locals(),
                               context_instance=RequestContext(request))
...

只有兩點,第一個是記得從django.template中匯入RequestContext,另一個是多給render_to_response一個可選的引數context_instance,並將其設為RequestContext(request)。如此一來,restaurants_list.html模板便具備了{{perms}}變量了。

我們回到剛剛的html,利用perms.restaurants.can_comment可以得知當下的用戶是否具備了restaurants這個app中的can_comment權限,一個標準的{{perms}}變量使用法為:

{{ perms.<app名稱>.<權限名稱> }}

讀者們如果已經暈頭轉向了,沒關係,只要把握住基本的要點就可以了,畢竟我們還沒有正式談到RequestContext,我們將在之後的筆記中詳細地討論他,讀者最後會發現使用RequestContext的模板不但具有perms變量,還有user等其他重要的變量,更重要的是,這是我們解決CSRF的重要手段。

然而,跟檢查用戶是否登入一樣,html的限制無法擋住使用URL對頁面直接存取,解決之道便是使用視圖函式來做一個檢查跟限制:

#mysite/restaurants/views.py
...
def comment(request,id):
    if request.user.is_authenticated and request.user.has_perm('restaurants.can_comment'):
        ...
    else:
        return HttpReponseRedirect('/restaurants_list/')

同樣地,使用重導或顯示錯誤都可以。

當然我們也可以使用方便的修飾符,首先我們將剛剛的檢查式寫成一個function:

 def user_can_comment(user):
    return user.is_authenticated and user.has_perm('restaurants.can_comment')

接著我們可以使用@user_passes_test:

#mysite/restaurants/views.py
...
from django.contrib.auth.decorators import login_required, user_passes_test
...
@user_passes_test(user_can_comment, login_url='/accounts/login/')
def comment(request,id):
...

這個修飾符需要兩個參數,一個是用來判斷權限通過與否的函式,另外一個關鍵字參數是一個login的url,他將會在權限測試失敗時將使用者重導回登入頁面,當然,該URL也可以填寫其他頁面的URL,只是使用login頁面作為重導目標跟參數名稱比較一致,另外,該修飾符會很好心地附上一個next查詢字串在重導的URL後面,期待能將使用者在正確登入後重新導向原先的頁面。

但是由於這種登入檢查+某種權限檢查是一種常態,於是發展出另外一個更便捷的修飾符:@permission_required,用法如下:

mysite/restaurants/views.py
...
from django.contrib.auth.decorators import login_required, permission_required
...
@permission_required('restaurants.can_comment', login_url='/accounts/login/')
def comment(request,id):
...

這個修飾符一樣需要兩個參數,只是他的第一個參數直接給定權限的名稱,也不需要寫一個判定函式,因為他預設會檢查用戶是否登入(is_authenticated)和是否具備指定的權限。其他的部份跟@user_passes_test一模一樣。

當然別忘了,這兩個修飾符都需要匯入。

參考來源:
http://dokelung-blog.logdown.com/posts/234896-django-notes-11-permission-and-registration

Python Django:Dinbendon(2)

  1. 建立餐廳列表
    要新增功能步驟一樣先設定urls.py
#.../Dinbendon/urls.py
...

from views import welcome
from restaurants.views import menu, list_restaurants  # 多匯入一個list_restaurants


urlpatterns = patterns('',
    url(r'^admin/', include(admin.site.urls)),
    url(r'^menu/$', menu),
    url(r'^welcome/$', welcome),
    url(r'^restaurants_list/$', list_restaurants)          # 新增一個對應
)

接著準備一個可以顯示餐廳列表的模版restaurants_list.html.

#.../restaurants/templates/retaurants_list.html
<!doctype html>
<html>
    <head>
        <title> Menu </title>
        <meta charset='utf-8'>
    </head>
    <body>
        <h2>餐廳列表</h2>
        <table>
            <tr>
                <th>店名</th>
                <th>電話</th>
                <th>地址</th>
            </tr>
            {% for r in restaurants %}
                <tr>
                    <td> {{ r.name }} </td>
                    <td> {{ r.phone_number }} </td>
                    <td> {{ r.address }} </td>
                </tr>
            {% endfor %}
        </table>
    </body>
</html>

最後則是view.py,加入一個新函數list_restaurants:

#.../restaurants/views.py
# 以上略...

def list_restaurants(request):
    restaurants = Restaurant.objects.all()
    return render_to_response('restaurants_list.html',locals())

結果:
enter image description here

  1. 修改menu.html
    由於menu.html不再負責顯示餐廳的資訊,而且也只負責顯示一家餐廳的menu,所以必須要修改一下.
#.../restaurants/templates/menu.html
<!doctype html>
<html>
    <head>
        <title> Menu </title>
        <meta charset='utf-8'>
    </head>
    <body>
        <h2>{{ r.name }}的Menu</h2>
        {% if r.food_set.all %}
            <p>本餐廳共有{{ r.food_set.all|length }}道菜</p>
            <table>
                <tr>
                    <th>菜名</th>
                    <th>價格</th>
                    <th>註解</th>
                    <th>辣不辣</th>
                </tr>
            {% for food in r.food_set.all %}
                <tr>
                    <td> {{ food.name }} </td>
                    <td> {{ food.price }} </td>
                    <td> {{ food.comment }} </td>
                    <td> {% if food.is_spicy %}{% else %} 不辣 {% endif %} </td>
                </tr>
            {% endfor %}
            </table>
        {% else %}
            <p>本餐廳啥都沒賣</p>
        {% endif %}
    </body>
</html>
  1. 建立出由餐廳列表連結至某餐廳menu的功能
    這邊列出兩種方法實作
    方法一:
#.../restaurants/templates/restaurants_list.html
# 以上略...
    <body>
        <h2>餐廳列表</h2>
        <form action="/menu/" method="get">
        <table>
            <tr>
                <th>選取</th>
                <th>店名</th>
                <th>電話</th>
                <th>地址</th>
            </tr>
            {% for r in restaurants %}
                <tr>
                    <td> <input type="radio" name="id" value="{{r.id}}"> </td>
                    <td> {{ r.name }} </td>
                    <td> {{ r.phone_number }} </td>
                    <td> {{ r.address }} </td>
                </tr>
            {% endfor %}
        </table>
        <input type="submit" value="觀看menu">
        </form>
    </body>
</html>

使用的是radiobuttons輸入欄位,這是一個用於單選的表單元件,我們設定他的name="id"value="{{r.id}}",這讓我們選出餐廳之後可以在request.GET中找到鍵值對:

request.GET[‘id’] => {{r.id}}
…… 來自於name, 來自於value

#.../restaurants/views.py

from django.http import HttpResponse, HttpResponseRedirect    # 新增

from django.shortcuts import render_to_response
from restaurants.models import Restaurant, Food

def menu(request):
    if 'id' in request.GET:
        print(type(request.GET['id']))
        r = Restaurant.objects.get(id=request.GET['id'])
        return render_to_response('menu.html',locals())
    else:
        return HttpResponseRedirect("/restaurants_list/")
   ...

先檢查request.GET中有沒有id,如果有我們就利用模型管理器objects的get方法,來取得對應的餐廳,並且透過render_to_response在menu.html中填入該餐廳的資訊,如果沒有提交的數據,則會將頁面重導至pattern/restaurants_list/對應的視圖函式。也就是說,沒有選出任何一家餐廳的話,menu function會讓我們回到餐廳列表直到我們選定了餐廳為止。

方法二

#.../restaurants/templates/restaurants_list.html
# 以上略...
            {% for r in restaurants %}
                <tr>
                    <td> <a href="/menu/?id={{r.id}}"> menu </a> </td>     # 改成本行
                    <td> {{ r.name }} </td>
                    <td> {{ r.phone_number }} </td>
                    <td> {{ r.address }} </td>
                </tr>
            {% endfor %}
# 以下略...

<a>標籤內的href屬性就跟form元件的action屬性一樣,他的值可以是pattern,這邊我們多附上屬於GET方法的查詢字符,並且給定查詢字符?id={{r.id}},其效果便如同之前使用表單一樣,因為這個id鍵值對也會被傳入到request.GET中,所以我們的視圖函式menu並不用修改。

  1. 製作餐廳評價系統
    在這邊實際操作一下POST方法
#.../Dinbendon/urls.py
# 以上略...

from restaurants.views import menu, list_restaurants, comment

urlpatterns = patterns('',
    url(r'^admin/', include(admin.site.urls)),
    url(r'^menu/, menu),
    url(r'^welcome/$', welcome),
    url(r'^restaurants_list/$', list_restaurants),
    url(r'^comment/(\d{1,5})/$', comment),          # 加入新的對應
)

下一步我們來修改一下模版,使得我們透過餐廳列表可以連結到指定的餐廳評價頁面

#.../restaurants/templates/restaurants_list.html
# 以上略...
        <table>
            <tr>
                <th>選取</th>
                <th>店名</th>
                <th>電話</th>
                <th>地址</th>
                <th>評價</th>  # 加入評價欄位
            </tr>
            {% for r in restaurants %}
                <tr>
                    <!-- <td> <input type="radio" name="id" value="{{r.id}}"> </td> -->
                    <td> <a href="/menu/{{r.id}}/"> menu </a> </td>
                    <td> {{ r.name }} </td>
                    <td> {{ r.phone_number }} </td>
                    <td> {{ r.address }} </td>
                    <td> <a href="/comment/{{r.id}}/"> comment </a> </td>  # 加入評價連結
                </tr>
            {% endfor %}
        </table>
# 以下略...

處理好前置作業後,要先來完成評價模型,需要注意的是,一個評價與餐廳是多對一的關係,我們需要設置外鍵,為了知道是哪個使用者留的評價,我們也需要記錄使用者名稱日期以及email(也許我們需要通知他呢)。

#.../restaurants/models.py
from restaurants.models import Restaurant, Food, Comment
# 略...

class Comment(models.Model):
    content = models.CharField(max_length=200)
    user = models.CharField(max_length=20)
    email = models.EmailField(max_length=20)
    date_time = models.DateTimeField()
    restaurant = models.ForeignKey(Restaurant)

有需要的話我們也把Comment模型註冊上admin

#.../restaurants/admin.py
from django.contrib import admin
from restaurants.models import Restaurant, Food, Comment

# 中略...


admin.site.register(Comment)

接下來是準備comment模版,這包含兩部分,我們會在頁面上方顯示評價,我們會在頁面下方顯示提交評價的表單

#.../restaurants/templates/comments.html
<!doctype html>
<html>
    <head>
        <title> Comments </title>
        <meta charset='utf-8'>
    </head>
    <body>
        <h2>{{ r.name }}的評價</h2>
        {% if r.comment_set.all %}
            <p>目前共有{{ r.comment_set.all|length }}條評價</p>
            <table>
                <tr>
                    <th>留言者</th>
                    <th>時間</th>
                    <th>評價</th>
                </tr>
            {% for c in r.comment_set.all %}
                <tr>
                    <td> {{ c.user }} </td>
                    <td> {{ c.date_time | date:"F j, Y" }} </td>
                    <td> {{ c.content }} </td>
                </tr>
            {% endfor %}
            </table>
        {% else %}
            <p>無評價</p>
        {% endif %}

        <br /><br />

        <form action="" method="post">
            <table>
                <tr>
                    <td> <label for="user">留言者:</label> </td>
                    <td> <input id="user" type="text" name="user"> </td>
                </tr>
                <tr>
                    <td> <label for="email">電子信箱:</label> </td>
                    <td> <input id="email" type="text" name="email"> </td>
                </tr>
                <tr>
                    <td> <label for="content">評價:</label> </td>
                    <td> 
                        <textarea id="content" rows="10" cols="48" name="content"></textarea>
                    </td>
                </tr>
            </table>
            <input type="hidden" name="ok" value="yes">
            <input type="submit" value="給予評價">
        </form>
    </body>
</html>

對date_time的顯示使用了過濾器date,他會依照格式顯示年月日, 另外使用了一個hiddentype<input>標籤,我們將利用檢查該表單元件的鍵值對是否有出現在request.POST中來判定表單是否被提交過。

#.../restaurants/views.py
import datetime # 記得匯入datetime

# 中間略...

def comment(request,id):
    if id:
        r = Restaurant.objects.get(id=id)
    else:
        return HttpResponseRedirect("/restaurants_list/")
    if 'ok' in request.POST:
        user = request.POST['user']
        content = request.POST['content']
        email = request.POST['email']
        date_time = datetime.datetime.now()     # 擷取現在時間

        Comment.objects.create(user=user, email=email, content=content, date_time=date_time, restaurant=r)
    return render_to_response('comments.html',locals())

在comment函式中,我們先檢查了id參數有沒有拿到,如果沒有就重導回餐廳列表。再來檢查表單有沒有被提交過(也就是檢查是不是第一次進來本頁面),有被提交過,我們便利用request.POST擷取表單個欄位內容並且利用Comment模型產生一個新物件(一筆新資料),最後我們一樣呼叫comments.html模版來回應。

  1. 對提交的表單進行驗證
    能夠進行表單驗證的方式有很多種,javascript就提供了一些不錯的方法,不過那畢竟是在用戶端進行的驗證,我們必須保證來到伺服器端的資料也是正確的,也就是說,我們希望在後端也進行驗證。

可以透過新增一個變數error在views.py裡來判斷表單有無正確填寫,但是如果現在有超級多的表單欄位呢 => 檢查空白的運算式會超長的,而且表單重填的工作量會超大. 所以這邊決定練習另外一種方式來對表單進行驗證.

表單模型化
- 建立表單模型
在restaurants應用的目錄下新增一個forms.py的檔案,他負責處理該應用的表單。

#.../restaurants/forms.py
from django import forms

class CommentForm(forms.Form):
    user = forms.CharField(max_length=20)
    email = forms.EmailField(max_length=20, required=False)
    content = forms.CharField(max_length=200)

每個Form類型都繼承自forms.Form,在該class底下我們可以設定該表單所擁有的欄位,不同類型的欄位對應到forms中的不同型別,只是要記得各欄位現在來自forms庫。

每個欄位的要求限制可以用參數的方式描述,比如說最大長度max_length或是此欄為選填(非必填)required=False。變數設置的順序也很重要,會影響到預設輸出的順序,盡量得依照最後輸出到html上的順序來設置。

  • 操作表單模型
    表單模型輸出的方式不只一種,它也支援了<p><ul>的輸出形式:

$ python mangae.py shell
- Form.as_table() => 表格輸出
- Form.as_p() => 段落輸出
- Form.as_ul() => 列表輸出

  • 輸出表單
    這種html的輸出特性讓表單模型可以作為模版上的變量輸出
#.../restaurants/views.py
from restaurants.forms import CommentForm
...

def comment(request,id):
    if id:
        r = Restaurant.objects.get(id=id)
    else:
        return HttpResponseRedirect("/restaurants_list/")
    if 'ok' in request.POST:
        f = CommentForm(request.POST)
        if f.is_valid():
            user = f.cleaned_data['user']
            content = f.cleaned_data['content']
            email = f.cleaned_data['email']
            date_time = datetime.datetime.now()
            c = Comment(user=user, email=email, content=content, date_time=date_time, restaurant=r)
            c.save()
            f = CommentForm(initial={'content':'我沒意見'}) #設定初始值
    else:
        f = CommentForm(initial={'content':'我沒意見'})
    return render_to_response('comments.html',locals())

當表單確定被提交後,我們會利用request.POST這個類字典當做CommentForm的字典參數產生一個表單物件,再透過is_valid方法檢查表單的正確性,如果正確,我們產生一個評價並存入資料庫,並且重設變量f為未綁定表單(空表單)。若不正確,變量f的各欄位依然會有原先填入的值。當然,如果表單位被提交,使用者將可以看到一個全新的空表單(未綁定表單)。

所謂綁定 => 表單已輸入資料、與資料綁定
透過表單物件的is_bound屬性,我們便可以得知它是否被綁定(已填入資料)。一個已綁定的表單物件,便可以進行驗證(未綁定的表單是不能進行驗證的)。

接著我們撰寫它要使用的模版

#.../restaurants/templates/comments.html
...
        {% if f.errors %}
        <p style="color:red;">
            Please correct the error{{ f.errors|pluralize }} below.
        </p>
        {% endif %}

        <form action="" method="post">
            {{ f.as_table }}
            <input type="hidden" name="ok" value="yes">
            <input type="submit" value="給予評價">
        </form>
...

在最上方去檢查了表單f的errors屬性,若有錯誤則提示用戶要更正下列提到的錯誤。
enter image description here

  • 客製化的表單輸出
    可以根據自己的web app調整出最適當的表格。

更換表單元件
表單物件是預設以<input>作為html元件的,如果我們想要更動這項設定,可以在表單模型中以參數widget來達成,比如說我們的content欄位想要用<textarea>而不是用預設的<input>,我們可以更動表單模型如下:

mysite/restaurants/forms.py
from django import forms

class CommentForm(forms.Form):
    user = forms.CharField(max_length=20)
    email = forms.EmailField(max_length=20, required=False)
    content = forms.CharField(max_length=200, widget=forms.Textarea)

我們透過widget參數設定其值為forms.Textarea,這將使得該文字輸入使用<textarea>元件而非<input>元件。這個設計良好的分離了視圖邏輯(widget參數指定用何種html元件呈現)與驗證邏輯(使用了CharField來驗證文字輸入)。

自定驗證規則
雖然表單中的各種欄位已經提供了預設的驗證規則,但畢竟不能滿足每一個人的需要,既然已經看到驗證這個工作可以移到表單模型上了,這種驗證邏輯與業務邏輯的分離應該是我們需要維持的,更何況我們希望維持一個統一的錯誤警告模式,解決這個狀況的方法就是在表單模型中加入以clean_表單欄位名稱為名的驗證方法:

#.../restaurants/forms.py
# -*- coding: utf-8 -*-

from django import forms

class CommentForm(forms.Form):
    user = forms.CharField(max_length=20)
    email = forms.EmailField(max_length=20, required=False)
    content = forms.CharField(max_length=200, widget=forms.Textarea)

    def clean_content(self):
        content = self.cleaned_data['content']
        if len(content) < 5:
            raise forms.ValidationError('字數不足')
        return content

從表單物件中拿出content欄位的cleaned_data,這點不用覺得奇怪,我們已經經過了基本的驗證(CharField的驗證,包含欄位不能為空等等),所以這邊自然可以拿到cleaned_data,否則會在更早的地方便知道錯誤,便也不會進行本項檢查了。

接著我們將已經進行完基本檢查的乾淨content數據從cleaned_data中拿出來,並且用len計算字數,小於5字我們便引發一個ValidationError例外,而使用的字串參數將會成為表單欄位驗證錯誤的提示。如果字數足夠,我們會回傳content作為驗證後的表單值。